my china Dune Buggy, 110cc build/modify

Mini Dirt Bikes & Pit Bikes Forum

Help Support Mini Dirt Bikes & Pit Bikes Forum:

This site may earn a commission from merchant affiliate links, including eBay, Amazon, and others.
cheers mate,
i like the idea of build threads, and updating them.
it gives me a decent record/referance point of what i have done and when.

i forgot to mention in my above posts too, when i had the motor out to fix the rear engine mount point i gave the motor a rub back and respray,
i just went for the satin aluminium look for the time being.
i will possibly redo it in the future with a full gloss coat, so the dirt/dust doesn't stick to the motor as much.

i am working on it at the moment too, sussing a new muffler mount point.
i fixed up the plastic spotlight housing with some thin steel plate, the vibrations finnaly broke the last one off.
and also used one of micks ideas for the 2 inner spot/headlights,
i found an old led torch that has 60 Leds in it, and also a high/low switch.
i took the battery cover off the back and found it used 6x AA batterys (9v)
it is now screwed and double sided taped onto the 2x inner spotlight mounts, i just need to find the right Ohm resistor to step the 12V down to 9V then hook up the wiring for that.

next time we take it out i will get some decent action videos of it too....

craig
 
thanks rodney,
yeah the kids love it, they are out driving around for an hour at a time, sometimes more.
my youngest even asked when will he cbe able to drive it.
i might need to fit some 4" blocks to the brake/throttle pedals soon !?!

they take a UHF 5w CB with them just incase they have troubles, and so they can check in every now and then.
we roughly worked out they have done over 500km's in it since buying it,
so besides the dodgy framework that it came with needing to be fixed/modded, i haven't had to do too much to it.
there are a lot of things i've upgraded and made better/safer etc too, but they didnt have to be done.
i've replaced the cdi, stator, coil, spark plug, clutch, starter and carby, bigger tyres/rims, and done about 5 oil changes in that time.

the new Heim/Rose joints arrived yesterday from UK, so i will be fitting them and giving the buggy a once over before we take it out next.

cheers, craig
 
Last edited:
thanks Rodney,


we took the buggy and bikes out to the farm again, for the long weekend a few days ago.
the kids had a blast, and probably put another 60-80k's on the clock too.
the weekend was pretty hot, 38C saturday, 40C sunday and 42C on monday.

the buggy is a lot smoother now after fitting the new Ultra High Performance upper ball joints (Heim Joints),
saturday night i had the chance to pull the steering column out and shim up the worn bearings too,
so i ended up taking out a fair bit of play and vibrations in the steering.

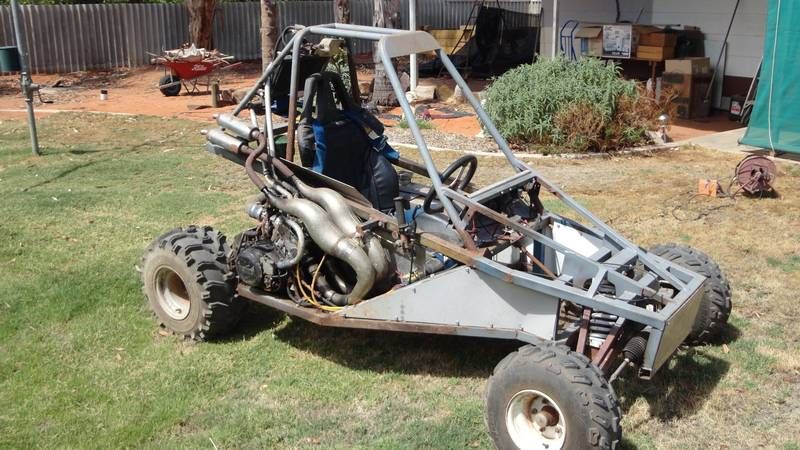
last week i took the big single piston, rear disc brake caliper off. (i had borrowed it off one of the pit bikes front ends and now had the bike back together, ready for a mate to ride)
i had used my custom Orion pitbikes' front caliper.
the original brake caliper fitted to the buggy, was the tiny twin piston type, that used the 15mm tall x 40mm long, disc pads
these brakes were hopeless stopping the buggy, especially from 70kmph.
a while ago i upsized the rear disc brake on the axle from a 160mm cross drilled disc, to a waved, slotted and offset 190mm disc i had spare.
i was trying to work out what type of caliper to use to make the brakes work better, and ended up fitting a large twin piston caliper, much like the latest DHZ 160's run.

the caliper mounts were fun to make, as one of the caliper slides comes off the bottom of the caliper the other at the top rear.
my new fabricated caliper mounts now have one slide at the back top, and the other is in the middle below the caliper mount on the frame.
it required notching out the existing frame mount to allow for the slide to move.
i also upgraded the brake master cylinder to another Nissin remote resevoired master i had sitting around spare.
it didnt take much to remount the master, and it makes it so much easier to top up the brake fluid, or flush it when i need to.
while i was at it, i also made up a mount to run a microswitch off the brake pedal.
the dune buggy now has a working eye level, led brake light, it came off a Hyundai .
i now have a way of telling when my son hits the brakes, comes in handy when i'm tailgaiting him, lol.

with the muffler mount, i thought i'd try something different,
i made up a couple of hooks, one off the engine frame and the other off the muffler, and i used a big rubber donut off a car exhaust.
on the second day away, i noticed that the exhaust header pipe, coming off the head, had a 40mm long crack running down it.
and it had started to crack horizontally too, damn, my new rear mount had allowed a bit too much movement and broken the front pipe.
i ended up temporarily wiring it back together with some exhaust heat wrap and some fencing wire.
i lasted the day and a half we had left there.
i picked up a brand new pitbike pipe from the bike shop yesterday arvo, cost $20, so now i just need to give it a cut and shut to make it suit the buggy.
when i mount it back on the buggys' engine frame/swingarm it will be bolted through a solid mount again, i've learnt my lesson there!

next time when we go there riding/driving again, i should be able to finish off wiring the electronic speedo too.
it is now all mounted into the dash securely, and i wired up all the accessory lights as well.
it now has speedo blue backlighting,
the battery indicator comes on when the ign is turned on.
this light goes out when the engine is running, it will also light up if the magneto charging circuit fails.
the indicators now light up on each side of the speedo when you use them.
the high beam warning light works too,
it just needs the sensor magnet fitted to the rear disc for the speed pickup and odometer, and all will be good.

i revised the bodywork on the front end too before we went away, the old foam checkerplate bonnet has now been retired to the bin.
and in it's place now sits a nice polished piece of 1.6mm thick Aluminium diamond/checker plate, i shaped it to match the contours of the front end, it kind of wraps around the bar work.
and i made another plate to sit across the front too, to stop any plants/weeds etc from flying though the gap and onto the drivers feet and floor.

another thing i got done was, i've replaced the dodgy china 100db electric horn, it was lucky to put out 50db i think, it was on its way out.
in it's place, i mounted an old air horn i had, it is 350mm long, and i mounted the air pump infront of the rack where there was some unused space.
we can now hear my son blasting the horn almost 1km away, it sounds like a train, lol
i doubt he'll have trouble attracting our attention if he needs to now.
i cut a 75mm round hole in the front of the new diamond/checker plate panel for the horn to blast through,
and riveted an old computer fans' chrome grill behind the hole, looks pretty neat.

thats about where i'm up to for the moment with the buggy,
i was hoping to get a lots pics on the weekend, but it all went too fast.
i will get a heap of pics and hopefully some videos too next time we are up at the farm in the next few weeks.

cheers, craig
 
Last edited:
Craig you might have to build the boy a Hayabusa buggy like the one i put up before as he gets older that would be awesome on the farm mate.
 
yeah it'd be awesome, but then again it wouldn't be for my boy!!!!

i spotted an Edge Products Sidewinder in the local classifieds the other week, complete rolling frame for $400, came will the full instructions/details,designs including pics etc of what parts are needed to complete it.
i have seen some like this with big cc engines selling for between $6000 and $10,000

sadly though, my inlaws are moving back locally later this year, so we'll have nowhere to use the buggy.
there are a few bike track around, but nothing much for the buggy.
i might have to look into some clubs maybe, like the Southern Districts Car Club ?
 
this one is close to where we ride, Edge Sidewinder RZ350 motor etc, complete and running.
it'd need full disassembly, repainting, and then a full nut and bolt rebuild though.
he wants $4500 for it

edge350rz.jpeg
 
Yes i have seen the edge sidewinder there was one down here on gumtree it had a XT600 engine in it i think they wanted around 5 or 6,000 for that. For $400 that would be a good buy for a complete rolling frame Craig.
 
This is awesome. Spent at the very least an hour reading and looking at it all. Soooo tempting to start something like this for myself now. If only there was room. Reminds me of things like the CBR engines in the golf carts. Keep up the amazing work. You have some great fabrication skills
 
thanks again,
i do need to remove the rear engine subframe again though.
my son gave it a hiding last time we were out with it.
the subframe has 3x cracks through it, it's the one of the few parts i havent replaced/remade yet.
and think we only have 1 more weekend away with it too, before my inlaws move back to town :frustrated::driver::frustrated:
 
What about boxing the frame? Do you think it'd help out to keep it from cracking and having problems?
 
the main problem with it, is the cheap china steel that was used when they originally made it.
i will remake the swingarm with heavier walled steel.
i have some here that should do the job.
and now that my phone is working again, i should be able to get some decent pics too.
 
Sweet. Yeah just keep updating this. Its very interesting and awesome what your doing making it better then ever
 
yeah will do, i'm picking it up during the week to bring back home.
 
nah, nothing yet,
i am waiting on the jets for the PW50 carby still.
once i get and fit them, im taking the PW up to the farm, and bringing the Buggy home to work on.
 
the buggy is back home again,


the new heim joints performed really well,


the 3x cracks in the rear subframe-


the dodgy exhaust repair

 
Last edited:

Latest posts

Back
Top