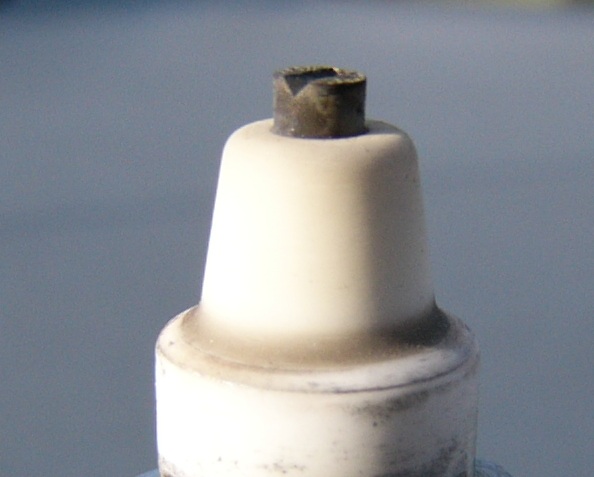
hey guys i did the trick of goin full throttle and then hitting kill switch and then cheaking spark plug straight away to try see if im running rich or lean the colour wasnt black but it wasnt white it was sorta abit of a tan colour with abit of a orange tinge to it wat colour should the plug be...???
You are using an out of date browser. It may not display this or other websites correctly.
You should upgrade or use an alternative browser.
You should upgrade or use an alternative browser.
Hit (KILL SWITCH) at full speed
- Thread starter motoXXX
- Start date


Help Support Mini Dirt Bikes & Pit Bikes Forum:
This site may earn a commission from merchant affiliate
links, including eBay, Amazon, and others.
Sidney
Well-Known Member
thats exactly what it's supposed to be.
a coffee colour?
a coffee colour?
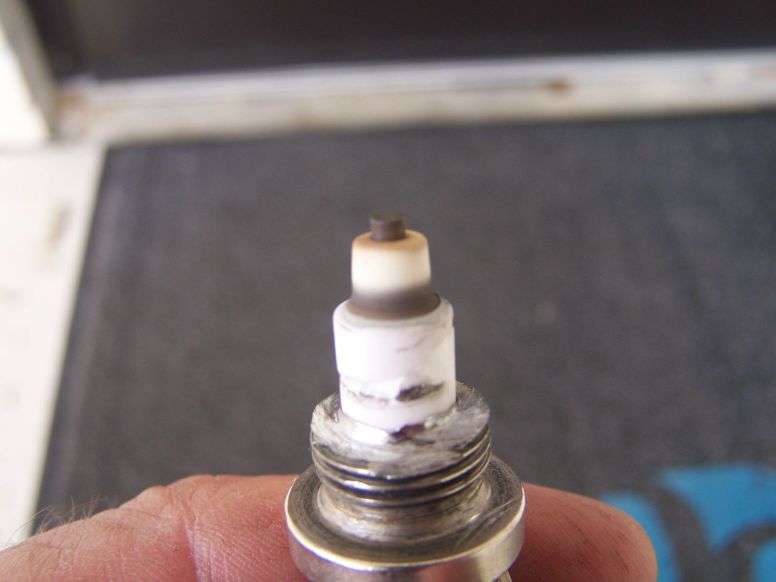
You need to look at the width of the carbon ring of the insulator buried deep down inside the plug. You can use a magnifing glass or chop the threaded portion of the plug off to view it. You need to use a new plug when you do it and be in the rev range you want to test.
mjc85
Well-Known Member
If its a coffee tan colour then its all good, no chopping plugs needed.
Just for your information as this is the method to use when doing a proper WOT plug chop. What you have done is just read the overall running condition of your engine, which sounds to be just about right from what you have said.
Plug readings are a mixed bag. I've found that--in my opinion--part of the problem is the subject is commonly misunderstood. Reading plugs with an accuracy that is actually useful is not as straight forward as we're sometimes led to believe. First thing to do is ignore the plug reading charts that have a whole bunch of plug tips of different conditions. Those charts are best applied by commercial mechanics trying to figure out why a tractor isn't running right--NOT a performance enthusiast trying to decide between a 160 or 165 main jet.
The old "tip of the ceramic insulator is a paper bag color" comparison applied to a plug with some hours of general run-time might be useful for determining if your overall jetting is in the ballpark. But I wouldn't rely on that for any measure of fine-tuning. There's just too many variables unaccounted for with a plug that looks like this:
http://i34.photobucket.com/albums/d133/gpracer2500/after2hours.jpg
Yeah, that looks nice--but I have no idea exactly what running conditions/settings where actually responsible for that coloring. Plugs don't just "remember" the last the last thing that happened to them. You could run a plug rich and then run the plug lean and it might come out looking great.
Yes. Brand new. To discern small jetting changes accurately you need to use a new plug for each test. An old plug will be a confused reading of all different throttle positions, engine loads, engine temps, etc. It doesn't really help that much to have an "average" because you may be arriving at that "average" by being jetted too far in opposite directions on different circuits.
I should also note that there is so much variation in composition of the pump fuels supplied today that reading a plug with you're particular fuel takes experience. There won't be (or at least may not be) an exact color or "look" to the plug that will indicate a precise a/f ratio that will hold across many different fuels. Some tuners choose to ignore what plugs look like these days for that reason.
So anyway, here's a good method for reading plugs:
-Warm up the engine on an old plug.
-Stop and install the new plug.
-Start it up and immediately take off.
At this point the best results may not be obtained exactly the same way for every application and fuel. Generally a single pass is sufficient; other times making a couple passes on the same plug will yield better results. By "better results" I mean results that are easier to interpret. But the basics are:
-Keep the throttle wide open as much as possible. We're testing the main jet. Any time spent idling or at partial throttle openings can confuse the results because the other carb circuits are at play.
-Accelerate at WOT through the gears until you get to 4th. Then hold that gear all the way to max rpm.
-At max rpm hit the kill switch and pull in the clutch.
-Coast to a stop and pull the plug for examination.
If multiple passes seem to yield better results for you then just remember to spend minimum time at partial throttle openings between the runs. After you've competed a pass, killed the engine, and oriented yourself to make another run; start it up and TAKE OFF staying in full throttle as best you can. This will help ensure that the only thing the plug tells you is information about the main jet size.
The place to read a plug is WAY DOWN inside at the BASE of the ceramic insulator. You'll never be able to fine tune by taking a casual looksy at a plug that's been run at all different throttle positions/temps/rpms/etc. As I mentioned, you may get a general indication of how things are but you'll never get "dialed" by looking at the end of the insulator on an old plug.
The reason they're called "plug chops" is because in many cases you've got to actually cut away the threads of the plug to get a good look at the appropriate area. There are also special plug reading tools that look a lot like the thing your doctor uses to see inside your ear.
This isn't from an XR but here's an example. This plug was colored with 3 WOT passes of about 7 seconds each. That was the only run time on the plug. Main jet = 148.
http://img62.imageshack.us/img62/4870/plug148mainmediumrh3.jpg
Same story but with a 152, just to show the difference.
http://img62.imageshack.us/img62/1542/plug152mainmediumoi2.jpg
When performing a plug chop test it's important to warm up the engine on an old plug, insert a new plug, and then immediately perform the WOT pass while spending as little time as possible at any throttle opening other than WOT. 4th usually works well for the pass. Then remove the plug and examine the "mixture ring" at the base of the insulator.
I've heard of reading a/f ratios off the top edge of the plug's threaded surface--the metal part that faces the piston. But I've no experience with this method. I believe it's the same idea as actually looking at the piston face to evaluate a/f ratios. Reading the "mixture ring" at the base of the insulator is tried and true--I do know that. Whatever method is used, a new plug is still required to get good info.
Here's another pic of a couple of test plugs:
http://www.dfn.com/benkaren/Plugs.JPG
As you can see, you don't necessarily have to cut all the threads away. Whatever it takes to get a good look at the bottom of the insulator is what it is. If your lucky, you may be able to see the mixture ring well enough without cutting anything. This is more likely to be the case on a colder plug (high numbers, i.e. 9 vs 8) because the bottom of the insulator isn't as deep into the plug. A magnifying glass can help too.
Here's some more. This one looks a little lean:
This one looks too rich:
There are better ways to confirm your pilot circuit jetting than using the plug.
Typically the main circuit (main jet) is the one associated with plug readings. I'm not sure if there's any reason that you couldn't read a plug for the needle circuit though. Just do the same as you would for the main except instead of WOT use 1/2 throttle.
Yes. Hot air is less dense. Humid air is also less dense. Anything that reduces the density of the air will push your jetting rich. Said another way, when it's hot and humid, you'd need to lean out your jetting to compensate.
mjc85
Well-Known Member
So you waste a $6 spark plug every time you test?
eichkay
Well-Known Member
I wouldnt say waste, its a very accurate way of dialling in your jetting. It can be the cheapest horespower you can get...
Maybe for a factory team that has the time and man power to bother..