You are using an out of date browser. It may not display this or other websites correctly.
You should upgrade or use an alternative browser.
You should upgrade or use an alternative browser.
Porting!
- Thread starter noidea
- Start date


Help Support Mini Dirt Bikes & Pit Bikes Forum:
This site may earn a commission from merchant affiliate
links, including eBay, Amazon, and others.
yes it gets ground flush in the intake port. I have in the past taken some off the exhaust valve guide and some remove it altogether. I like some in there as the guide is the main conducter for the exhaust valve to rid itself of heat and also acts to shield the valve stem from the high temp gases rushing past in the first place. I have been leaving it alone and just reshaping and reducing the obstruction and polishing the exhaust port.
Last edited:
born2slide1980
Well-Known Member
Thanks for the kind words Mack, I knew it would not be perfect but it sound like I am sort of getting in the ball park with the short side. Wish I had of seen that "homework" post before I did a final clean up of the port (saw a link or an add for it in his break in secrets article and even signed up for his online newsletter, which I never received and never could find the porting guide either).
Think I understand what you are talking about when it comes to flattening out where it drops over the edge, but at what point should you start to blend it back into the round shape of the valve seat?
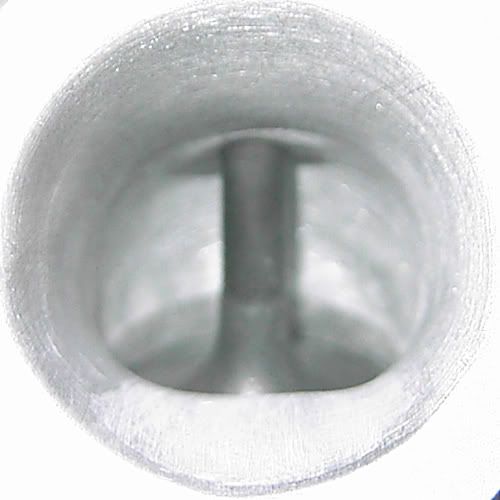
This a what my port look like before and after I got it back from the machinist and before I attempted a final clean up and blending of all angles;

It has a much flatter shape around that drop of area.... Which I now realize may have been better left as it was, but I started worrying about whether I had choked the port down to much and couldn't really remove any more epoxy, from where I had the break through to the valve spring seat area. Oh well that will give me something to play around with in the near future, mabey sooner than later.
BTW the motor was going pretty dam hard with the final porting effort and bigger valves, even though It has lost a fair bit of compression for the moment with the metal they had to remove for valves and the dished piston it is running. I have just managed to kill at least one of my gears so it will be in pieces again soon and ready for another porting attempt, with a fresh set of jailing gears ready to go in from DHZ ($60).........Cant wait to get a cam and hi comp piston in there.........Yeah Ha!!!
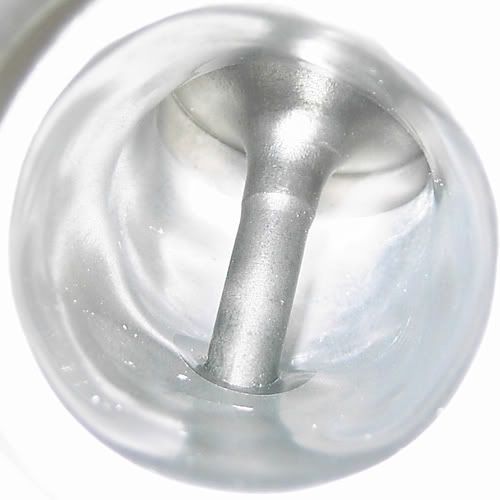
Tubes I didn't really intend to cut the guide right down on this head, I got a bit carried away while trying to knife-edge it and actually cut through in one place so I had to grind it down flush and probably made a bit of a meal of that also.
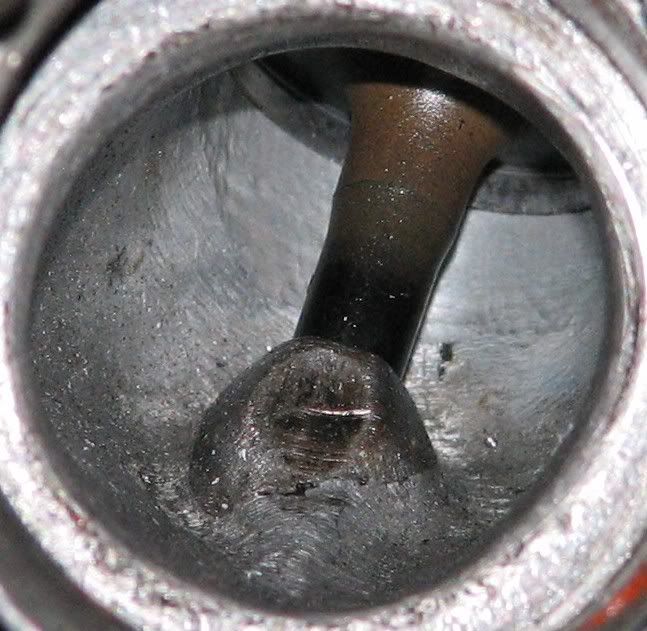
I managed to get a much better finish around that area on my 140 head (which is still in progress), without having to deal with breaking through to the seat area, but it probably has something to do with he fact that this head already has a big valve and port setup;
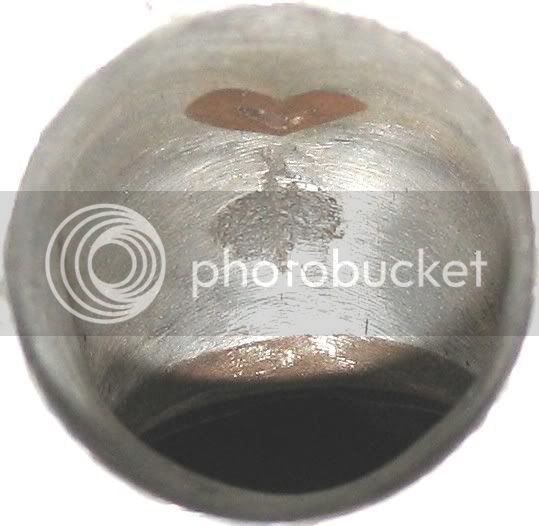
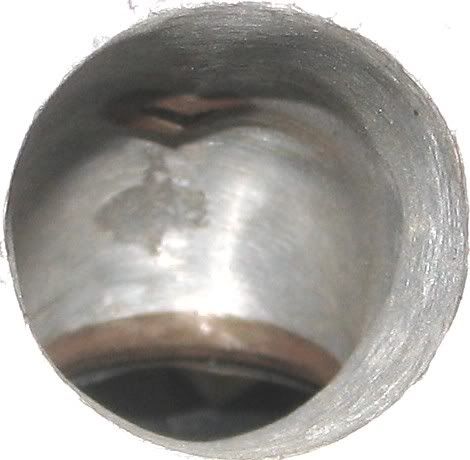
and here is the 119's exhaust, its not pretty...... Also I probably took out to much metal on the first effort, so I kind off want some carbon to build up here;
Think I understand what you are talking about when it comes to flattening out where it drops over the edge, but at what point should you start to blend it back into the round shape of the valve seat?
This a what my port look like before and after I got it back from the machinist and before I attempted a final clean up and blending of all angles;
It has a much flatter shape around that drop of area.... Which I now realize may have been better left as it was, but I started worrying about whether I had choked the port down to much and couldn't really remove any more epoxy, from where I had the break through to the valve spring seat area. Oh well that will give me something to play around with in the near future, mabey sooner than later.
BTW the motor was going pretty dam hard with the final porting effort and bigger valves, even though It has lost a fair bit of compression for the moment with the metal they had to remove for valves and the dished piston it is running. I have just managed to kill at least one of my gears so it will be in pieces again soon and ready for another porting attempt, with a fresh set of jailing gears ready to go in from DHZ ($60).........Cant wait to get a cam and hi comp piston in there.........Yeah Ha!!!
Tubes I didn't really intend to cut the guide right down on this head, I got a bit carried away while trying to knife-edge it and actually cut through in one place so I had to grind it down flush and probably made a bit of a meal of that also.
I managed to get a much better finish around that area on my 140 head (which is still in progress), without having to deal with breaking through to the seat area, but it probably has something to do with he fact that this head already has a big valve and port setup;
and here is the 119's exhaust, its not pretty...... Also I probably took out to much metal on the first effort, so I kind off want some carbon to build up here;
Last edited:
You don't need to worry about blending to the rounded shape of the valve, because you actually want a flat floor in that area. The floor height you already have is ok, but you can take more out at the sides where the epoxy blends to the walls. This will "square" up the floor and walls which, for magic reasons, is a desirable shape at this point. So the port will also end up much wider than it is tall. Think about what is happening at this point in the port.
The mixture is being split into two columns of gas as it passes around either side of the valve stem. By going wider at this point you are making room for this outward movement. With the raised flat floor you are also setting good conditions for the mixture to enter the 90 degree bend prior to the valve. By squashing the mix upwards and outwards as it splits around the stem, you are forcing more mixture out towards the two sides of the valve opening which once again is less directed at the exhaust valve area and helps force yet more mix to that least used area at the bottom of the valve opening.
The mixture is being split into two columns of gas as it passes around either side of the valve stem. By going wider at this point you are making room for this outward movement. With the raised flat floor you are also setting good conditions for the mixture to enter the 90 degree bend prior to the valve. By squashing the mix upwards and outwards as it splits around the stem, you are forcing more mixture out towards the two sides of the valve opening which once again is less directed at the exhaust valve area and helps force yet more mix to that least used area at the bottom of the valve opening.
Dirtrider
Well-Known Member
what bred of motor is the head off? you did a nice job of the portsYeah, i broke into the spring seat area, but that was welded back up. Fitting the 24/28 valves is an easy job, just get the seats cut to suit them..About a $80 job
")
what bred of motor is the head off? you did a nice job of the ports
Hey there, the head is off my 138cc lifan. Tubes, i'm not sure if you can use JB weld to fill the break through as i didn't.
Dirtrider
Well-Known Member
Did you just use the die grinder to flatern out the valve guide, and if so is there anything to watch out for when you do it.
I used a dremel with some carbide cutters like this

then i went to use sanding drums in my dremel. On the intake side i started with 80 grit and stopped at 80 grit.
On the exhaust side i started at 80-120 then wet sanded all the way to 400+ then turtle waxed it
then i went to use sanding drums in my dremel. On the intake side i started with 80 grit and stopped at 80 grit.
On the exhaust side i started at 80-120 then wet sanded all the way to 400+ then turtle waxed it
born2slide1980
Well-Known Member
Excellent thanks for clearing that up a bit Mack (flipped those pics around too), I have a very basic understanding of the principles involved, in high velocity porting and I did try to make the intake port a bit wider around this area. But wasnt sure exactly how much to build the floor up and I certainly didnt realize, that a floor that flat would be of any advantage.
Le Garage they are some looking sexy looking ports you have there....Nice work. That definitely gives me something to aim for in the future.
I dont want to ruin this great thread with all my crappy pics and babble (if I havent already that is), so here is the last of them;
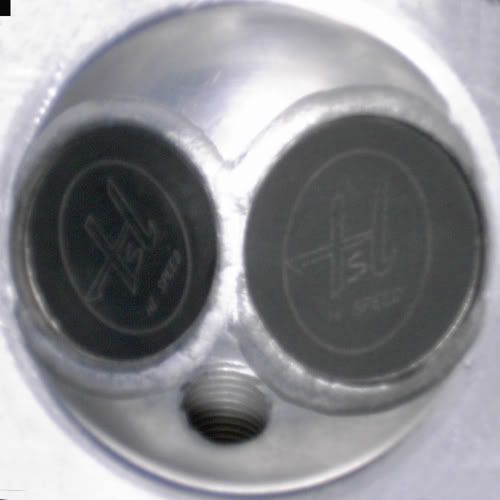
My now BV and brothers SV heads (same motor);

Just got it back from the machinist;

After a quick clean up and 2 min polish (will get it decked properly once a piston and cam have been found);


Cheers.
EDIT: I now realise how stupid it was puttting up these porting posts and pics... I did not try to stuff anyone around or anything like that, or know how much trouble it would cause... I am so very sorry for my actions ( I spent frigging ages trying to get the ports etc. right and did not think it through properly, or realise how secrectative it all is) and have now removed them...
Le Garage they are some looking sexy looking ports you have there....Nice work. That definitely gives me something to aim for in the future.
I dont want to ruin this great thread with all my crappy pics and babble (if I havent already that is), so here is the last of them;
My now BV and brothers SV heads (same motor);
Just got it back from the machinist;
After a quick clean up and 2 min polish (will get it decked properly once a piston and cam have been found);
Cheers.
EDIT: I now realise how stupid it was puttting up these porting posts and pics... I did not try to stuff anyone around or anything like that, or know how much trouble it would cause... I am so very sorry for my actions ( I spent frigging ages trying to get the ports etc. right and did not think it through properly, or realise how secrectative it all is) and have now removed them...
Last edited:
Yes you can jb weld the breakthrough up but you want at least a couple of mm over the top and must use a reasonable size shim under the spring to distribute the load.
Welding the port up and recutting the spring seat shallower than stock is obviously the way to go if you want to really modify the angle and shape of the port.
Welding the port up and recutting the spring seat shallower than stock is obviously the way to go if you want to really modify the angle and shape of the port.
Dirtrider
Well-Known Member
has any one had problems with grinding their valve guides down flush with their ports?
born2slide1980
Well-Known Member
Sound as though I should of used something a little bit stronger as my shim, So what size would you recommend for this Mack???
I would use .5mm made from good shim stock.
You will find the newer heads like those on the 140's are much easier to port and it is not necessary to break through.
As for grinding the guides down, no there is no problem. These valves are very short and the lift is small so there is minimal side thrust on the guides. After long use the guides may wear but I haven't seen any yet where the valves didn't need work first and then new guides go in anyhow.
ducar.r.spec
Well-Known Member
- Joined
- Apr 30, 2007
- Messages
- 1,735
- Reaction score
- 0
http://www.miniriders.com.au/forum/mini-chat/8872-185cc-gilfax-monster-motor-5.html for u porting fellas