CT110 & Daytona 190f

Mini Dirt Bikes & Pit Bikes Forum

Help Support Mini Dirt Bikes & Pit Bikes Forum:

This site may earn a commission from merchant affiliate links, including eBay, Amazon, and others.
Hmmmm. Not sure if I should send this engine back now or not. Has anyone done a post on how to word this engines up before?
 
I wouldnt be sending it back, it shouldnt be that hard to get it sorted. Mount the Daytona cdi to the frame, plug in wiring loom, and splice in the necessary wiring from the postie into the power source wiring from the daytona. Perseverance is the key here, nothing is ever simple when marrying china and Japan lol
 
Yeah like stu said ^, plug the stator wiring into the daytona harness, mount the cdi somewhere, connect the 2 wire's from the kill to the daytona harness

With the lighting and battery on your bike, does your regulator/rectifier look like the one on the left or the one on the right ?
The full wave regulator/rectifier is the one on the left, it's the one you need for full wave lighting coil's (one's that have 2x yellow wire's)
The one on the right is for a differently wired lighting coil, a half wave one (with a white wire and a yellow wire)


You may be able to modify the wiring from the stator to work with the half wave regulator/rectifier but i haven't tried doing it, and i don't want you to kill your lighting coil if it doesn't work that way.
 
It looks like the one on the right, but with a hole at the top with wire earthed behind it
 
Yeah they both have a tab with a mounting hole on the top, just the angle of the picture doesn't show it though.
The one on the right isn't the correct reg/rect for the Daytona lighting coil, it could kill your reg/rect if you hook it up to the daytona's 2 yellow's

How have DHZ told you to join the yellow w/green wire, and the yellow from the Daytona stator to the CTs' wiring ?
 
Last edited:
They're sending the correct regulator.
Daytona yellows to the yellow and white
 
Ok, cool.
I tried wiring my 190 to the half wave reg/rect and the reg/rect blew up internally the first time i kicked it over.
Now i have the correct one (left in pic above) but haven't had a chance to try it out.

Are you going to make your own manifold spinner ?
 
Ah... Going to extend the carby out further with spacer essentially. Just needs another 5-10mm.

Got the regulator being sent tomorrow. Wiring is all set up and got spark, so now just need the regulator and we're well on our way finally. Thanks for all the help... Might do a "how to" post for future postie to Daytona conversions...

Off to Perth in morning and back Monday night. Hopefully I come back and find my brother in law got it all going, then I'll just have to switch over the lights and I'll be one happy lad.

Bloke at DHZ helped a tonne today too.
 
Last edited:
If you need any help with wiring or tuning, or jet's for the Keihin etc let me know, i live about 20 minute's away.
Don't forget to check the valve to rocker clearance's, (.005" to .007" @ tdc on the compression stroke) and give it an oil change before you run it too.
 
Valve to rocker clearances? Sorry mate but my mechanical knowledge is minimal haha.

Will the carby need bigger jets you think?
 
I don't know what jetting it will need, but you'll hear it revving funny it if it does need doing, it'll pop, backfire through the carby, backfire through the exhaust, splutter, hesitate etc etc.
Each carby need's to be tuned to the set up you have in your bike, a different exhaust can make the jetting need's change, even a different type of air filter, over oiling the foam air filter etc etc


When you are ready to start kicking it over, make sure you kick it over from just past top dead centre on the compression stroke, and give it decent kick.
If you just kick it over from where it is, you risk the chance of getting kick back which can hurt your foot,
it can damage the clutch basket rubber's, damage the kick start gear's and even crack one of the case's that hold's the gearbox and bottom end together.
It's easy to do, once you have done it a few time's you'll suss it out.
And don't let your mate's jump on and start kicking it over randomly either, or it could cost you some $$.


Valve/Rocker clearance's should be checked before you run the engine just to make sure they are ok.
When the factory's assemble the engine's most of the time they are just done to feel instead of being set to spec's using a feeler gauge.
If you run it as it it may be hard to start, hard to tune, then play up even more once the engine warm's up
If left as delivered for the life of the engine it can cause more damage by burning out the valve's and even piston damage.

This video run's through the process and explain's what's involved, different pit bike engine but same sort of process.

[video=youtube;QJciyJRJh8Q]https://www.youtube.com/watch?v=QJciyJRJh8Q[/video]
 
Last edited:
This is the Daytona 190fdx manual PDF / part's list
http://daytona-global.com/products/pdf/86876.pdf

Here is the clutch cable you need
NEW Clutch Cable Fits 2013 Pitsterpro Z160 HO GPX 125 Engine | eBay

This is the gearbox end where i was explaining the threaded adjuster section to you today

$_12.JPG


Exhaust flange gasket
2 X Exhaust Gasket Ring (Gold) ? Buy Online Australia at DHZ

2_22_232.jpg


This is the filter i would recommend for the Keihin PE28, those mesh filter's let a lot of dirt/dust through and into your engine
UNI FILTER | 48mm ID, 72mm OD, 100mm Long, 30 Deg Angle | Buy Online Australia at DHZ

Did heavy duty chain
DID 428D Roller Chain, 120 Links | Buy Online Australia at DHZ

16T front sprocket
http://www.dhz.com.au/buy/16t-sprocket-428-17mm-shaft/SW-05.16.17MM

or 17T front sprocket
http://www.dhz.com.au/buy/17t-sprocket-428-17mm-shaft/SW-05.17.17MM


I just had a look at the online gearing commander website and selected CT110 2005
http://www.gearingcommander.com/

Stock gearing for the CT110 is 15T front/45T rear, this give's a top speed of 85.6km/h @ 8500rpm
I changed the rpm limit to 11500 for the daytona and using the same gearing as you have now it has a top speed of 115.4 km/h @ 11500rpm
The dont make a lot more power higher than 9500rpm's though, so a top speed more around 95km/h.
This engine will want to lift the front wheel in your bike though, and hill's won't be a problem from this torque monster.


Changing the rear sprocket to a 41T will increase the top speed to 105 km/h @ 9500 rpm
Then adding a 16T front sprocket to that will increase it again to 112 km/h
Or adding a 17T front sprocket to the 41T rear sprocket will give you a top speed of 119 km/h
 
Yeah sorry mate. Had to order gasket and chain and sprocket at show n go. Couldn't get hands on a 41 though for the rear. Going to get on to the clutch cable this week.
 
Stock gearing on the rear should be fine with the tall Postie wheel's anyway
There's not a lot of place's you'll be holding it wot in top gear unless you're a regular on the freeway's etc.
Dassa have the same Z160HO style clutch cable's in stock for $20 iirc
 
Sprocket and chain arrived, filter and gasket get in Monday. Just got the gear lever and clutch cable also. Hopefully on weekend can get to U Pull It and grab that cooler
 
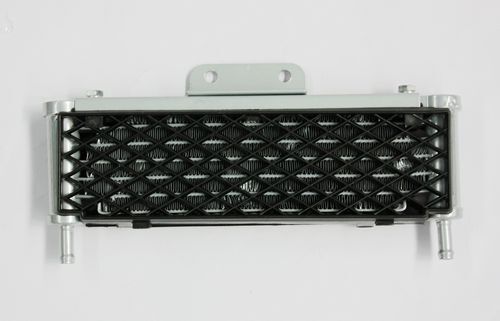
I have a spare Braaap oil cooler if you want to buy it, you'll just need oil cooler line's then (about $20 - $25 for a pair)
This is an example of the line's, my cooler has 10mm thread's at either end to suit banjo fitting's, not like the barb's in the pic below.
10mm Banjo 405mm OIL Cooler Radiator Hose Line PIT PRO Quad Dirt Bike ATV Buggy | eBay
My cooler sort of look's like this one, but use's banjo fitting's instead of the barb's
I will post a pic when i get one

$_12.JPG
 
Last edited:
Yeah I'm interested. How much you looking for? Will I need a second cooler or just the one will do?

Will it make any difference if I have the pod filter facing forwards?
 

Latest posts

Back
Top