Exciter coil.

Mini Dirt Bikes & Pit Bikes Forum

Help Support Mini Dirt Bikes & Pit Bikes Forum:

This site may earn a commission from merchant affiliate links, including eBay, Amazon, and others.

the_bard

Well-Known Member
Joined
Mar 19, 2014
Messages
54
Reaction score
0
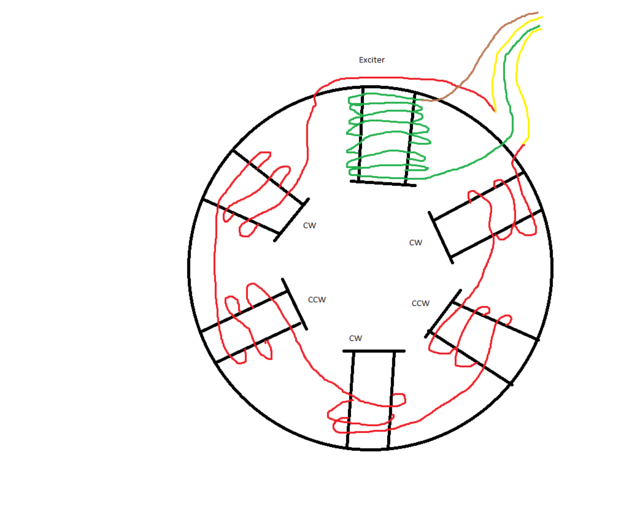
Hey everyone, I was wondering does anyone know what gauge of wire/how many turns are in the exciter coil in a Chinese pit bike?
I've got an old postie bike that I'm planning on converting to CDI ignition and I want to copy the pit bikes so that I can use the cheap CDI, coil, regulator etc.
I have a stator but it's in good working order so I don't really want to cut it up if someone on her could tell me.
I've seen on the net various gauges mentioned for exciter coils between 38 and 34, if someone could give me a indication for these bikes I'd be very happy!
Thanks in advance.
 
Can you post up a pic or a link of the stator you want to rewind ?
Most of the time it's easier to just buy a new one
Are you wanting to do one with a half wave lighting/charge coil (1x yellow, 1x white wire), or a full wave (2x yellow wires)
 
I'll get a pic up in a bit, but not as easy as buying a new one.
The postie bike is an old 6V from '72 with points ignition and a inner rotor, it's got a 6 pole stator same as my pit bike.
I'm planning on rewinding it with 1 pole as the exciter and 5 for the charging (again same as the pit bike), with a 12V conversion while I'm at it. I'll probably go with the half/half charge coils but mainly concerned with the exciter first.
 
You used to be able to buy a crank adapter to make them longer so you can use the pitbike stator's
The stator just need's some minor clearancing with a file or grinder.
The adapter is shown just above the flywheel nut on the right below

attachment.php
 
I'll get a pic up in a bit, but not as easy as buying a new one.
The postie bike is an old 6V from '72 with points ignition and a inner rotor, it's got a 6 pole stator same as my pit bike.
I'm planning on rewinding it with 1 pole as the exciter and 5 for the charging (again same as the pit bike), with a 12V conversion while I'm at it. I'll probably go with the half/half charge coils but mainly concerned with the exciter first.

Are you attempting the rewind yourself?? if your in Victoria l know some old school blokes that have repaired some of my rewinds.
 
It's easy enough to rewind them, just need to mark the coil where to start the winding's and in which direction they need to go.
Otherwise you have a 50% chance of getting it right
You need to check the insulation between the iron core and the winding's and replace it if necessary.
Then you need to count how many turn's as well, so it has the right output, and have it finish at the original spot so it run's off the coil in the right direction

Jaycar sell the roll's of enameled copper wire for under $10
 
yeah I'm planning on rewinding it myself.
This is a pic of the spare stator for the ct90 which I've stripped the windings off and the stator from my pit bike which I'm intending on copying, both are 6 pole I assume I can't see any reason I can't just copy and then use the chinese CDI/regulator.
20151028_110431_zps5x3eopeq.jpg

I'm thinking I'll use 1 pole for the exciter about .3mm wire and about 600-800 turns. The rest I'll use 1mm wire and probably just coil it on until it looks roughly the same thickness as the pitbike coils.
Only thing I'll change is to swap from half phase to full phase with the charging coils.
With those do I just do it like this?
stator_zpsi93huabs.png

Alternating the direction of the coils between Clockwise and Counter-Clockwise? or should they all be wound in the same direction?
 
I'm pretty sure the winding's are all in the same direction, the magnet's in the flywheel are positive/negative/positive/negative etc from memory
 
I had to repair a daytona style stator because there was a gouge in the exciter coil(and because I'm a tight arse who doesn't like forking out for new parts if i can fix it), so i unwound it until i had removed all of the damaged copper, sanded off the enamel and soldered on the new wire and wound it back up and then epoxied cloth over the windings. This is what i used, under $5 from jaycar, i just measured what was on there with the verniers and bought the same size.
IMG_2015102839256.jpg
Obviously the lighting windings are a thicker guage, here a guide that will give you a few ideas for that
https://home.comcast.net/~pgailunas/stator.html
 
Last edited:
Ah they are alternating direction, I hooked up a battery to the coil and checked with a compass, sweet I guess all that's left now is to grab the wire/resin and get to work :D
 

Latest posts

Back
Top