Help yx 150 won't rev up backfiring

Mini Dirt Bikes & Pit Bikes Forum

Help Support Mini Dirt Bikes & Pit Bikes Forum:

This site may earn a commission from merchant affiliate links, including eBay, Amazon, and others.
seeing as the engine looks like it's been through some mud/water,
i would be pulling all the wirings' plugs/sockets apart and giving them a quick spray with wd40 etc

it could have a corroded terminal, or bad connection somewhere that is causing it to missfire?
check that there is a good earth from the main wiring loom to the frame,
and also a good earth from the ignition coil to the frame.
take the bolt out of the terminal that holds the earth to the frame, clean off all the paint that might be making a bad connection, wipe it with a thin smear of grease to stop it rusting, and put it back together
same thing with the ignition coil, take it off, clean the frame with sandpaper smear it with grease and refit it


do you have a multimeter to be able to test the wiring, just in case you still have no spark ?
 
So when I bought the bike from my buddy he told me he just put in new outer rotor full kit with flywheel and new CDI. He never got it to run right after that. He told me it was a liftan kit off ebay. I went through all his wiring and I am sure it's right. The bikes only dirty from trying to bump start it down the driveway all the connections are good solid and clean I wired it according to this diagram. All all the colors are the same along with the pin locations in the CDI.image.jpg
 
I can pick up a multimeter tomarow to test it.

Also I checked the pickup clearance to the nob on the flywheel and it is very close but not touching.

I'm debating in just buying a whole new wiring kit for this and a new mikuni carb. I might save myself some headaches but then again I might just open a new can of beans by doing that
 
have you checked out the head? my gpx 125 did this exact same thing after i did the valve clearances, i had done them with the flywheel slightly off tdc without realising it had rotated around that little bit. turns out with my hi compression motor the clearances were that tight that i managed to bend a valve stem and put a hairline crack in the piston. i no that doesnt explain your lack of spark now, but if its still not revving at all, might be time to pull the head off.
Once I get soark again and if it doesn't rev I will try pulling the head. The bike ran fine before the kid put new wiring system in it but it's been siting for a year. Got it pretty cheap was just hoping it would be a simple fix lol but it turned into a mess
 
just look at each individual plug/socket on the loom they are only cheaply made,
sometimes the terminals can pop out of the plug or socket, and cause an intermittent connection/fault

yeah, the clearance for the pick sensor on the side of the flywheel needs to be about .1mm or .004"
 
it still sounds like there is a blockage in the Pilot jet circuit to me

try taking the air filter off, and totally block the intake side of the carby with your had, now at the same time, kick it over a few times to put a vacuum through the carby.

now take your hand off (there should be a bit of fuel on your hand), refit the filter and try starting it, no throttle etc
it will take a few kicks, but if it fires then there is still a blockage in the carby.
 
i've had another look at your pics,
looks like you've had a nice hard hit to your thumbnail ? that would have hurt!


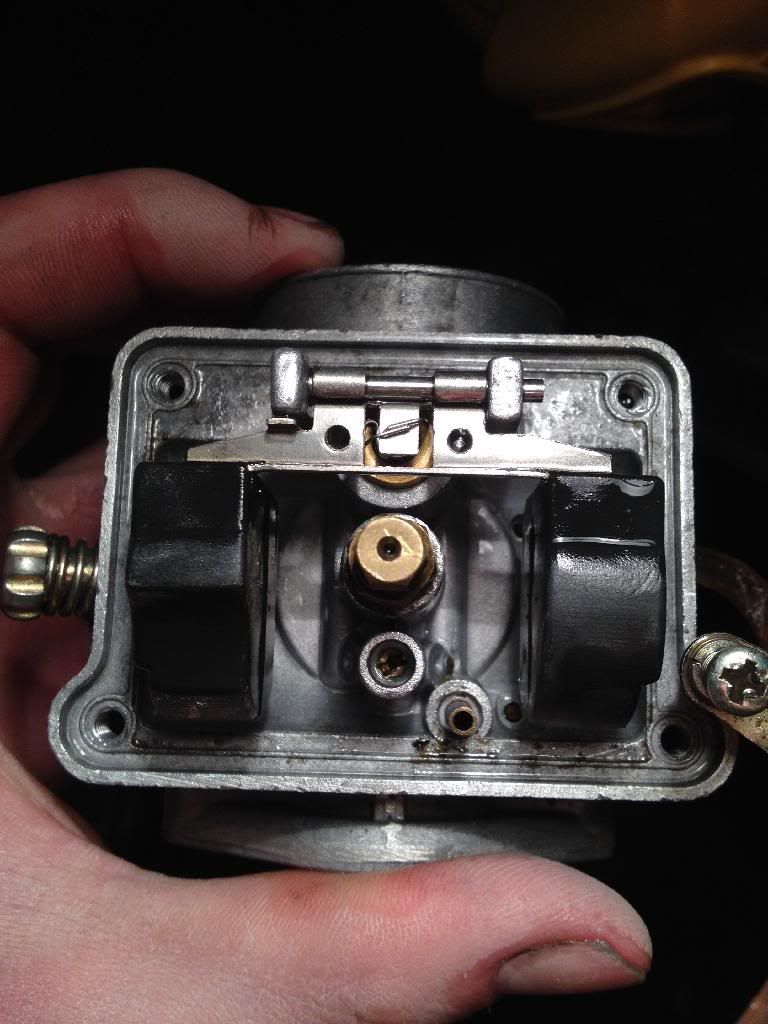
this shot shows the Pilot jet just below the main jet.
it sits recessed down the hole/thread
when you had it out, can you see light through into the bore of the carby ?
poke some wire or something through the hole a few times, sometimes gum can build up in it and restrict the hole.
then give it a thorough blow out with the compressor


take the Mixture screw out completely when you do this, and blow the compressed air into that hole too.
you should be able to feel it coming out through the pilot jet hole in the carby base.
and also feel it coming out one of the holes on the air filter side of the carby.


don't go buying another wiring/ignition kit just yet, it might be something simple


the Molkt carby you have now, is a lot easier to tune than the Mikuni copy carby you linked too.
 
i've had another look at your pics,
looks like you've had a nice hard hit to your thumbnail ? that would have hurt!


this shot shows the Pilot jet just below the main jet.
it sits recessed down the hole/thread
when you had it out, can you see light through into the bore of the carby ?
poke some wire or something through the hole a few times, sometimes gum can build up in it and restrict the hole.
then give it a thorough blow out with the compressor


take the Mixture screw out completely when you do this, and blow the compressed air into that hole too.
you should be able to feel it coming out through the pilot jet hole in the carby base.
and also feel it coming out one of the holes on the air filter side of the carby.


don't go buying another wiring/ignition kit just yet, it might be something simple


the Molkt carby you have now, is a lot easier to tune than the Mikuni copy carby you linked too.

Yes I took everything apart blew every hole with compressed air and I used gauge pins from my work to stick in jets that fit perfect. I looked at them through a microscope too and they are plenty clean. Maybe I should put new jets in it? I need a new float needle anyway because it keeps pissin out fuel into my air filter. I noticed the rubber coned point was a little deformed so it must not be sealing right when the bowl fills up image.jpg

And yeah I smashed my thumb hard with sledge hammer! Lol

Where can I get a rebuild kit or just parts for this carby


I talked to tbolts and they rev omen I switch over to the mikuni vm26
 
Last edited:
is it still leaking fuel ?
and is it out of the top vent, not the bottom one ?

if so, it could be that the float is touching on the tubes inside the carby and making it stick and then the needle and seat can't close properly.
also check that where the needle sits into the seat, that the seat doesn't have any rough edges for the rubber on the needle to seat into.
you could slightly recut it with something like a 3mm drill bit, just give it a few turns by hand to skim the rough edges off.
even a small philips head screwdriver will work.

you still haven't said whether you checked the hole is clear where the Pilot Jet screws into the base of the carby.
hold it up to the light looking into the hole/threads where the pilot jet screws in, and make sure it is open


with both the Molkt and the Mikuni being made in china, some of them are a bit off spec.
the Mikuni is a better carby yeah, but tuning it to suit your engine is a bit awkward, as the mixture screw is hard to get at underneath at the front.
 
Leaking out top vent but mostly leaking through the hole on the inside face of the carb that leads to float needle

Yes I can see light through it it is clean as can be.

The reason I'm considering getting a mikuni Is I can't find parts for this carb

I cannot re drill the rubber on the float needle it's way to deformed to make a seal
 
yeah, that means the float is getting stuck and flooding it.
 
Thanks I have a buddy with a pitster, idk what carb he has in it but I'm going to rob it off his bike and give it a try.

I'll be testing my whole electrical system tonight with multimeter is there anything inpetticular I should look for?
 
This is what I'll be doing....

STATOR:

(Once you have the ignition cover off) Visual test: Inspect the coil bar , if you see any bulges or discoloration its likley worn out
Voltage Meter will be set on AC for testing output
The stator should have 80-100VAC (usually black/red)
Set meter to OHMs
OPEN circuit or infinity OHMs is bad

COIL:

Set meter to OHMs
OPEN circuit or infinity OHMs is bad
 
to check the electrics
ignition coil-
to test the primary windings of the coil
first unplug it from the main loom.
set your meter to 200 Ohms, put one lead to the + terminal and other lead to the _ or earth point
you should get a reading around .7 Ohms

to test the secondary windings of the coil
set the meter to 20K Ohms,
unscrew the spark plug cap off the lead, place one lead to the + terminal and the other into the end of the spark plug lead
it should read around 3 - 5

any higher readings, or a zero reading could indicate a fault.


stator check-
first find the loom coming up out the engine to the main loom,
unplug the green, blue w/white stripe, and black w/red stripe wires
to test the pickup coil,
set your meter to 200 Ohms,
place one lead from the meter to the green,
and the other lead to the blue w/white stripe wire
you should get a reading around 130 Ohms

to test the source coil
set your meter to 2000 Ohms,
put one lead to green, the other lead to the black w/red striped wire
you should get a reading around 380 Ohms

same again, a big variance from either of these could mean it has a faulty coil
 
moki carbs are a ***** to tune fiddle with the air fuel mixture and u will be right could also be timeing as my yx 150 is doing it at so I am doing carb tune will let u know how it goes
 
Ok out testing electronics so far and here's what I have come up with

Checked stator- set @ 2000ohms. Blue/white wire and green a checked at 97.7 ohms

Source coil-set @ 2000 ohms. Black/red wire and green checked at 338 ohms

Primary coil windings- set @200 ohms black/yellow + wire/terminal and green ground checked at .7 ohms

Secindary coil windings- set @20k ohms spark plug lead wire with cap removed and black/yellow + terminal checked at 2.71ohms
 

Latest posts

Back
Top