Help Daytona Anima Clutch install

Mini Dirt Bikes & Pit Bikes Forum

Help Support Mini Dirt Bikes & Pit Bikes Forum:

This site may earn a commission from merchant affiliate links, including eBay, Amazon, and others.
Nice work.
Hey did the 190 kit come with instruction's ?
You've done well swapping crank's over with the clutch issue being the only problem !

Lol, yeah i'm the same.
I get a lot more thing's done when my family is asleep or at school/work.
I average about 4-5 hour's sleep a night

The time zone difference's don't help us when we're trying to diagnose and fix bike's on the other side of the world either


Now you just have to give the engine a few heat cycle's to get the ring's to bed in properly
Change the oil/clean out the filter's to get rid of any fine metal particle's etc
Then take it out to the track to give it some gas, ride it like you stole it !

Might need some playing around with the jet's now too with those extra cc's...


So what was the outcome with the dished clutch plate too?
 
Last edited:
1st Ride :)

[video=youtube;2U_ZMNYpBE4]https://www.youtube.com/watch?v=2U_ZMNYpBE4&feature=youtu.be[/video]
 
On the dished clutch plates I used what we call here redneck engineering... I took that plates and put the in a big bench wise and pressed them back into the right flat shape. Seemed to work for the time being at least.

On the stroker kit I did not have instructions however there was a series of good videos I found on Youtube that showed a guy putting together a 150 engine and they are basically the same deal. It hasn't blown up yet but it isn't making power yet that I feel is an improvement over the 150... actually worse just driving it around the street a bit. I have not yet done anything with the jetting or ignition timing.

On heat cycles do I just idle it and rev it? Or do I ride it around some?

On the 150 ignition advance changes made a huge difference so I am hoping this will help wake this motor up. I actually won my 2nd race on the 150 but I got a great deal on the stroker kit for $200 so I went for it.
 
I noticed on your ride that the clutch is taking a little to re-engage after you use it

Do you have a little freeplay on the clutch lever before it start to pull on the clutch ?
Have it so there's about 3mm movement at the lever before you feel resistance, or else the clutch will be partly engaged and you'll wear out the plates prematurely.

This could also be the plate's that were damaged causing it it to be slow re-engaging.
You might be able to use a 1mm washer under each clutch spring to make them a bit stiffer too ?

Heat cycle's i would try and get in around 3 or 4 cycle's, ride it around for 20-30mins then let it sit and cool, do this 3 or 4 time's
Don't load it up too much, and keep the rev's under 3/4 throttle.
Vary the rev's a little too.

Jetting it, i can't remember off hand what you have in the PE28 now, but i'm guessing it'll need some between a 118 and a 130 main jet.
Pilot jetting sound's like it's pretty close mow, so maybe get the next one up too.
How many turn's out is your mixture screw set at now ?


While running it in for the first couple of tank's i'd stick with the standard timing/rev limiter setting's as well


Did you reset the timing chain tensioner when you reassembled the engine with the new 190 crank ?
Also were the valve clearance's checked/adjusted ?


Don't go throwing away your old 150 cylinder and crank either, i might be interested in them


Ps, with you clutch plate's is this the method you used to flatten them? lol

[video=youtube;ZykR3yqQjqE]https://www.youtube.com/watch?v=ZykR3yqQjqE[/video]
 
Last edited:
Ha ha yes thats the way it's done man... some day when I'm rich and pretty I'm gonna have a personal mechanic to work on my stuff :) I tend to do more breaking than fixing but I do like to tinker I must admit.
 
I noticed on your ride that the clutch is taking a little to re-engage after you use it

Do you have a little freeplay on the clutch lever before it start to pull on the clutch ?

No there wan't any free play so I will set that.


Have it so there's about 3mm movement at the lever before you feel resistance, or else the clutch will be partly engaged and you'll wear out the plates prematurely.

This could also be the plate's that were damaged causing it it to be slow re-engaging.
You might be able to use a 1mm washer under each clutch spring to make them a bit stiffer too ?

Heat cycle's i would try and get in around 3 or 4 cycle's, ride it around for 20-30mins then let it sit and cool, do this 3 or 4 time's
Don't load it up too much, and keep the rev's under 3/4 throttle.
Vary the rev's a little too.

Jetting it, i can't remember off hand what you have in the PE28 now, but i'm guessing it'll need some between a 118 and a 130 main jet.

Yes I have the PE28. I am at 5,280 ft elevation and had the 150 running 38 slow jet and 105 main jet I believe.

Pilot jetting sound's like it's pretty close mow, so maybe get the next one up too.
How many turn's out is your mixture screw set at now ?

I am 2 turns out on the mixture screw but for some reason it won't idle. Seems to me that the throttle screw just needs to be turned (out I believe is increasing the throttle?). For some reason doing this does not help increase throttle... WTF?


While running it in for the first couple of tank's i'd stick with the standard timing/rev limiter setting's as well.

OK


Did you reset the timing chain tensioner when you reassembled the engine with the new 190 crank ?
Also were the valve clearance's checked/adjusted ?

Yes I just lined up the sprocket on the cam chain to the indicated mark... it's this little line.
On the valves I put them at 6mm I believe but they are clanking so I wonder if I messed that up. If I remember correctly the manual said between 5-7mm on the intake and exhaust.


Don't go throwing away your old 150 cylinder and crank either, i might be interested in them

I wasn't going to toss away the old cylinder and crank the 150 ripped but I was getting a little power greedy I guess. It's a great motor... when it's set up right. I was getting to the front on most of the starts against mostly Japanese 2 strokes 65 & 85cc.


Ps, with you clutch plate's is this the method you used to flatten them? lol

I used a bench vise this time but this is a perfectly acceptable method as well :)
 
To raise the idle speed you want to turn the screw in.


When you adjust the mixture screw, you need to let the bike warm up
Raise the idle speed by a couple of hundred rpm by turning the idle speed screw in a bit.
Then adjust the mixture screw in until it start's to stall.
Listen to the way the engine rev's, you want to find the point where it run's at the smoothest/fastest rpms
Turn the mixture screw out 1/4 turn at a time, then let it settle for 10 seconds or so
Then turn it out another 1/4 turn and let it settle, etc etc
Once you have it running at the smoothest/highest rev's then adjust the idle speed screw back out till it idle's back down at a normal speed.


Yeah it'll run richer being that high up due to less air, so the main would be close when comparing it to my jetting.
But i'd still try and do a plug chop just to make sure, it'll be running a little hotter than last time being a fresh top end


Valve clearance's i have mine set at .006" inlet and exhaust
And when doing the clearance's make sure the flywheel mark is lined up at 12 o'clock too, with the Cam marking at 9 o'clock (compression stroke)
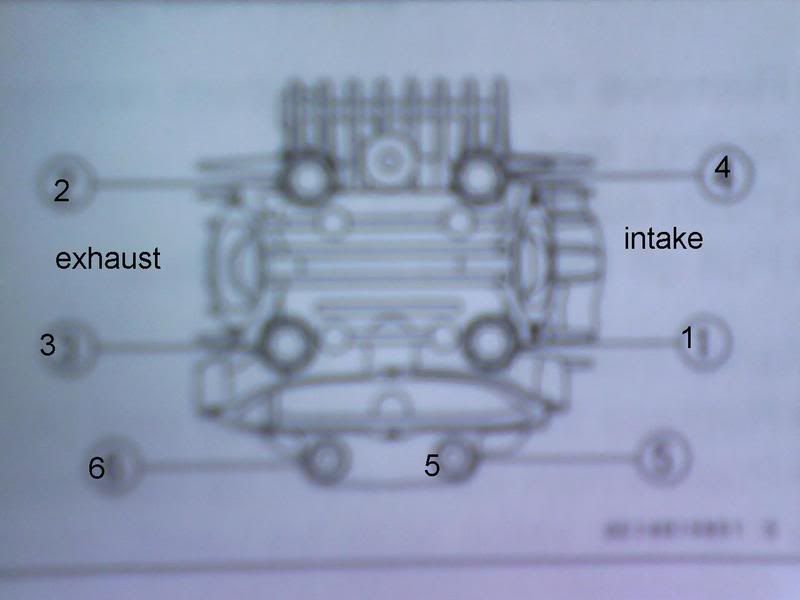
Check you head bolt torque again too, the head gasket might have settled since being heat cycled
 
So after a few heat cycles the base gasket started spewing oil.

I am going to take off the valve cover and re torque the two allen bolts. If my understanding is correct these are the only two points that torque everything down... which seems strange to me because they are just on one side of the engine ??? Either way I need to get this thing running before the weekend. I am seriously considering pulling it apart and putting the 150 kit back in because that was a package I had working pretty good :(
 
I will start a new thread for this Daytona 190 stroker kit install problems
 
I can retitle the thread if you need,

There's 2 allen head bolt's on the timing chain side of the cylinder.
What about the 4 nut's on the end of the stud's ?

attachment.php
 
Do you know what the torque procedure is? I found a threat that said I should only be putting 15ft/pounds on the 4 nuts on the head... so the majority of the torque would be on the two allen bolts?

PIA
 
Where exactly is the base gasket leaking ?
Did you notice if the cases were matched when you had it apart? eg no ridge where the 2 case halve's meet ?

I haven't rebuilt an Anima before, but some engine's i've done have had a decent step in where they join case' halves
I usually try to machine it back level, but you can use sealer there like Yamabond or 3 bond etc to make up for the different level's
I only use it an inch or so either side of the join.
Head bolt's are usually around 11 Nm / 8 foot pound's, if they leak just nip them up a bit.

If you do have to loosen the head stud nut's and the 2x socket head bolt's make sure to remove you timing chain tensioner and reset it while you do the re torquing, then refit it after it's all tightened up.
Do the 2x socket head bolt's last though (make sure you loosen them off before tightening the head nut's), tighten the head stud nut's, then tighten the socket head's
Make sure there's oil on the stud thread's and copper gasket's too so it doesn't bind up.

0702071820.jpg
 

Latest posts

Back
Top