Porting!

Mini Dirt Bikes & Pit Bikes Forum

Help Support Mini Dirt Bikes & Pit Bikes Forum:

This site may earn a commission from merchant affiliate links, including eBay, Amazon, and others.
this is without a doubt one of the most informative threads i have read in a LONGG time. excellent posting by both of you on this subject and i second your thoughts on having this as a sticky. great work gentlemen, keep it up.

Cheers, Tony.
 
very good thread............ let me know if you start another thread as i'd like to share a few things........
 
Hi
So what´s the status on the Dukarhead??.......and This is by far the best thread I ever read....inclusive a lot in planetmini...;) ...but unfortunately there everybody makes a misterium out of porting:D
 
im getting a motovert outlaw 140cc motor in a few weeks im gona get the shop to port and polish it while the motors in the shop cant wait to get it. How much more performance would u get from port and polish?
 
.....0.005hp:D if you don¨t do it right;)
 
Last edited:
ok so ive read all that, also researched on planetminis, and ive got stock head, today i was trying to port it, had some problems,
how do you get the valve guides out without damaging them???
and also instead of ramping the tight radius up with metal paste, i just cut it down a little would this be ok???
 
The tight lower radius is just that...so making it shorter and tighter is not ideal.

The guides do not need to be removed in the majority of cases but if you do want to remove them ,use a tool made for the job add a little heat to surrounding area and press them out. Or, go see an engineering shop.
 
yeh i know its an old thread but its better to repost on this one then make a new thread all together
ps why bother posting that it isnt needed

anyway, mack i didnt make it tighter i ground it down a bit so the radius is bigger, i know you arent supposed to hog them out and i really didnt want to take any material out of that spot but it was the only way of getting rid of the tight radius without building a platform up with jb weld, i might try that next time
so what do you think will it still be better than a tight radius?
 
No I don't think it will be better. You have to think of a port flowing like a water pipe....up until it comes to the valve. Then your thinking must change. All mixture must pass through a ringed gap. Not only that but the portion of the ring closest to the exhaust valve has most of the gas rushing straight at it and this gas will pass through with hardly any deviation in direction. The further around the circumference of the ring the greater the degree of direction change for the mixture, and at the lower extreme portion of the ring ( the tight section we are talking about) the gas has to practically turn back on itself to exit past the valve.
portflow.jpg


Blue line is stock flow
Red is what i think you are saying you have done
Orange is with a raised floor

As this piccy shows even though it seems like you have flattened out the radius of the port floor you have just made the mixture do a sharper turn closer to the exit point which is not good. But by raising the floor with epoxy you get the mix started on its turn much earlier and create a larger turning circle.This also has the effect of directing more of the charge at the least used portions of the gap thereby increasing the usable valve area. Gas directed at this area of the valve is not lost out the exhaust port during valve overlap, has a greater scavenging effect in the cylinder and cools the piston crown, just to name a few of the benefits of getting your porting just right.
 
Last edited:
i never thought of it like that, looks like i will have to get the jb weld out after all.
 
is there any tips or secrets on how to get the jb weld to stick to the head in a strong uniformed manner without much porosity.
 
i read sumwhere that u drill very small holes where u want to put the jb weld that gives it a better places to stick
 
Any good port in a storm

I would just like to say that this is a great thread and it has inspired me to have a crack and port both my 140cc lifan and 119cc jialing (or jialing copy) heads.

the 140 head is still sitting om the bench half finished, but I have finaly got my 119cc head back from the machinist. It now has a big valve setup with the 27mm intake (turned down about 1mm to clear exhaust valve) and 23mm exhaust from the 140 now fitted, custom seats and multi-angle grinds. I tried to get it all done as cheap as possible and told to them not to rush, so it did take a little while to get it back in the end. But it only cost me about $135 to get it all done (best money I have spent yet!)

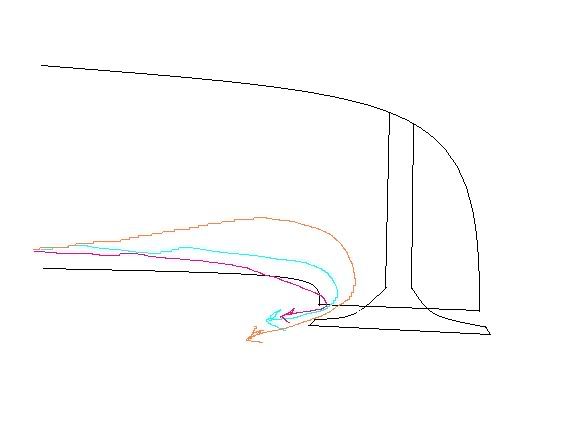
Anyway here is a couple of pics of the intake port, I used epoxy to build up the short side radius, to help create a better angle for air to flow to that part of the vale and seat and also create a higher velocity for the airflow at the same time. Also I had to use some more z-spar to patch up and give some support to the spot where I broke through into the valve spring seat area, but it was very easy to fix, I have just used the original valve seat spring washer (didn't cost me anything extra) and all seems to going be well so far.

This is only my second go at porting, the first attempt was not very pretty to say the least and the head still bears a few battle scars from original my hack job (so please don't laugh to hard at my latest attempt). Mack I am very keen to get some feedback so I know what to do differently for the 140. Also I though the pics might help Tubes or any body else considering this mod, help get an idea of what to do..... or not to do when it comes to building up the short side radius etc.

The pics are a bit grainy,had to much around with photoshop as they were pitch black inside..... Oh well enjoy;

119ccintake_1769.jpg


119ccintake_1758.jpg


119ccintake_1756.jpg


119ccintake_1757.jpg


EDIT: I now realise how stupid it was puttting up these porting posts and pics... I did not try to stuff anyone around or anything like that, or know how much trouble it would cause... I am so very sorry for my actions ( I spent frigging ages trying to get the ports etc. right and did not think it through properly, or realise how secrectative it all is) and have now removed them...
 
Last edited:
Tubes the "homework" link posted above has all you need, just use that as a guide. Don't forget to plug the port with plasticene so epoxy won't flow all over your valve seats and everywhere else.

Borntoslide- you have conquered the worst of it...by having a go! All you need to do is shape the port a little better. It is hard to describe, but where the epoxy dissapears over the edge to the valve (from the view we have of your port), flatten this area. The end result will be like a "D" laying on its back.
 
Last edited:
I took a few so people can see all the different angles and what is going on

Here is the last of them;

119ccintake_1727.jpg


119ccintake_1730.jpg


119ccintake_1731.jpg


IMG_1766.jpg


Hope they help.............


Cheers Matt


EDIT: I now realise how stupid it was puttting up these porting posts and pics... I did not try to stuff anyone around or anything like that, or know how much trouble it would cause... I am so very sorry for my actions ( I spent frigging ages trying to get the ports etc. right and did not think it through properly, or realise how secrectative it all is) and have now removed them...
 
Last edited:

Latest posts

Back
Top