USD Fork pulldown, diagnostics and rebuild

Mini Dirt Bikes & Pit Bikes Forum

Help Support Mini Dirt Bikes & Pit Bikes Forum:

This site may earn a commission from merchant affiliate links, including eBay, Amazon, and others.

BananaMan

Well-Known Member
Joined
Feb 29, 2008
Messages
195
Reaction score
12
Location
attwood - melbourne
USD Fork pulldown, diagnostics, rebuild and questions

ok this is my first and its as much a 'help me out' as it is a tut, but here goes.

well a while back the forks on my atomik pro-x 140 failed so i bought a new set off a guy on here that had clicker adjusters, everything else was the same, bolted them up and thought everything was hunky dorey.

soon realised that they were not performing properly, they were bottoming out and sluggish.

so naturally i changed the oil to a thicker grade, 15wt, after getting the right ammount this time i went for a ride, waaaayyy to stiff, and still very sluggish, could now notice that the clickers seemed to do bugger all.

so i cracked the shats, pulled em off and started taking pics.

first off remove the wheel nut and axle and take the front wheel out, undo the brake caliper and fork guards, pretty simple so i dont have a photo of that.

undo the bolts holding the fork legs into the triples and slide the legs out.

now for the interesting stuff, start by clamping the lower leg in a vice using a set of soft jaws, stick a big screwdriver or bar through the axle hole and undo the foot from the leg.

foot.jpg


you will see a little black seal in the bottom of the leg once the foot is off, undo the bolt in the middle of this, screw in a longer bolt so you can hold onto it and wriggle out the oil seal.

oilplug.jpg


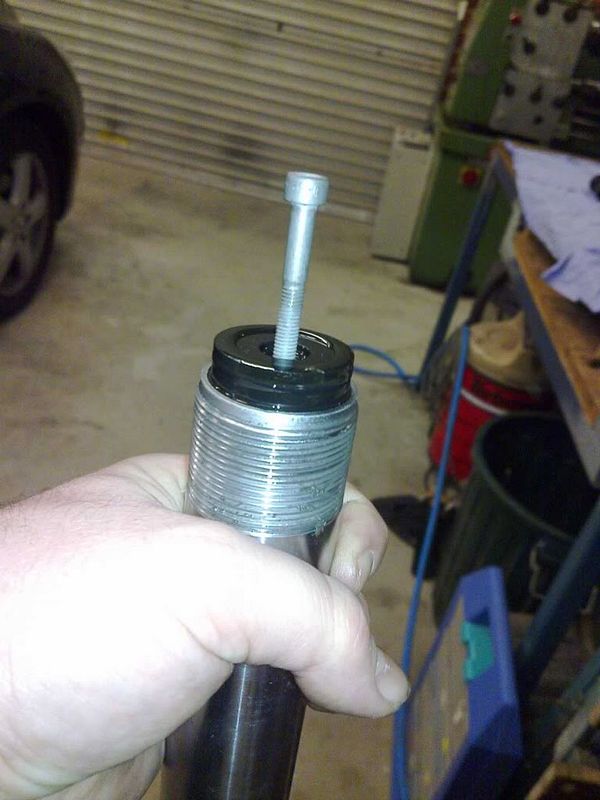
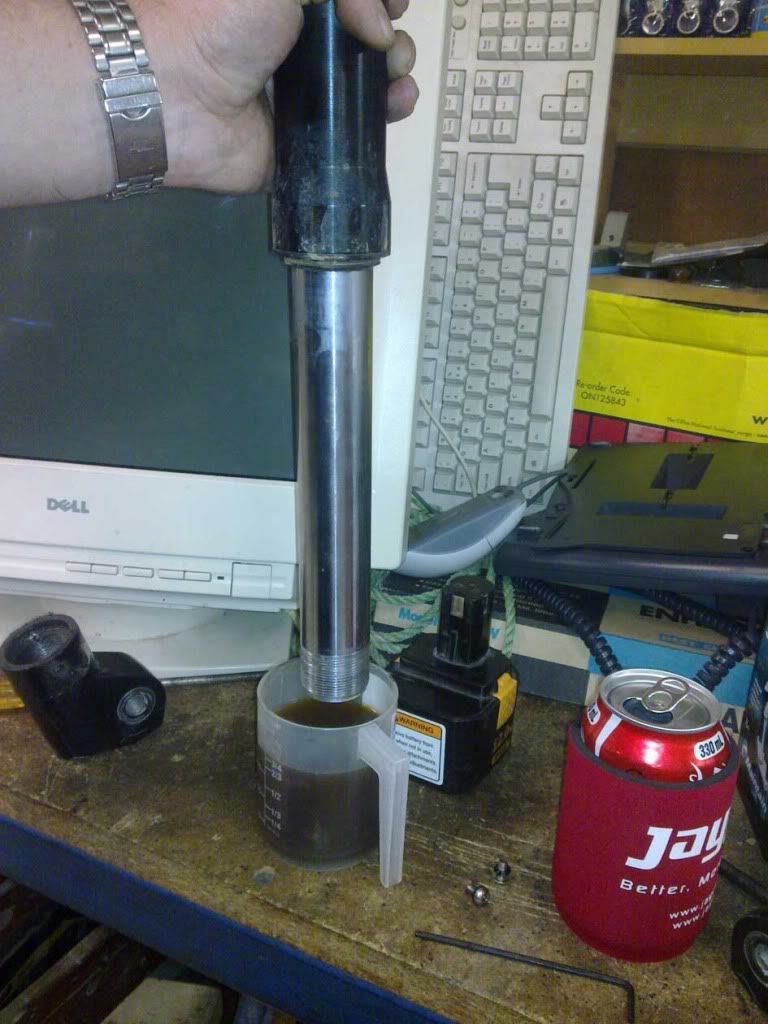
be carefull as the oil is under this and you dont want it going everywhere, carefully drain it into a marked container so you can measure the ammount that comes out, also you may need to pump the leg a little to get all the oil out.

drainoil.jpg


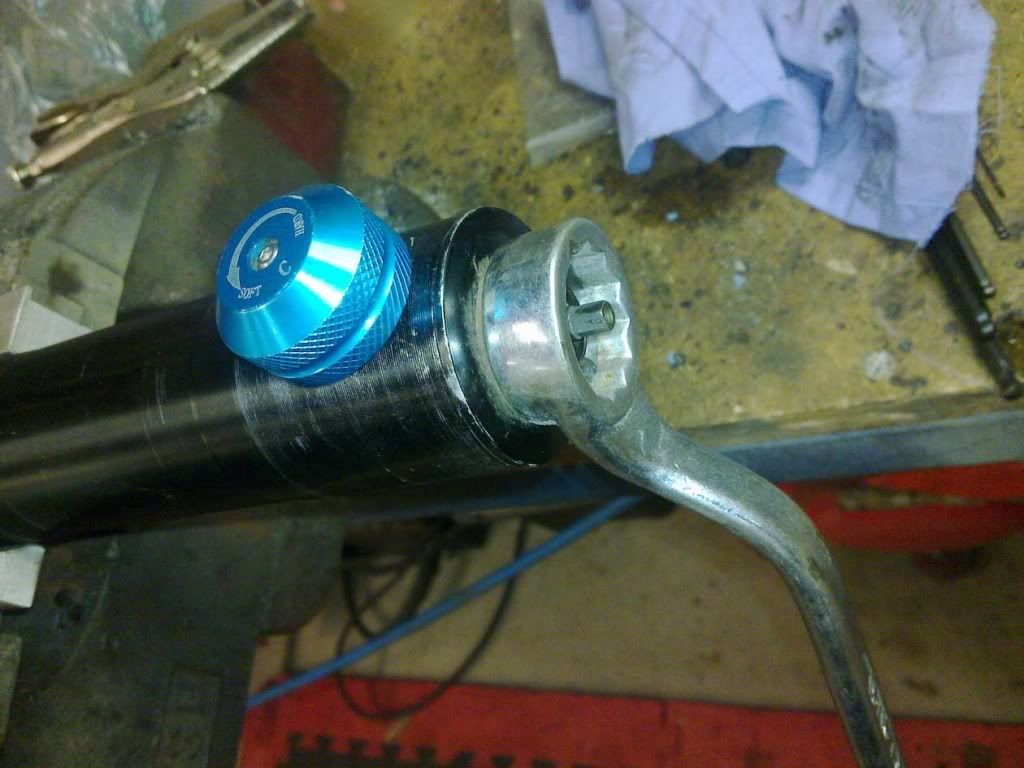
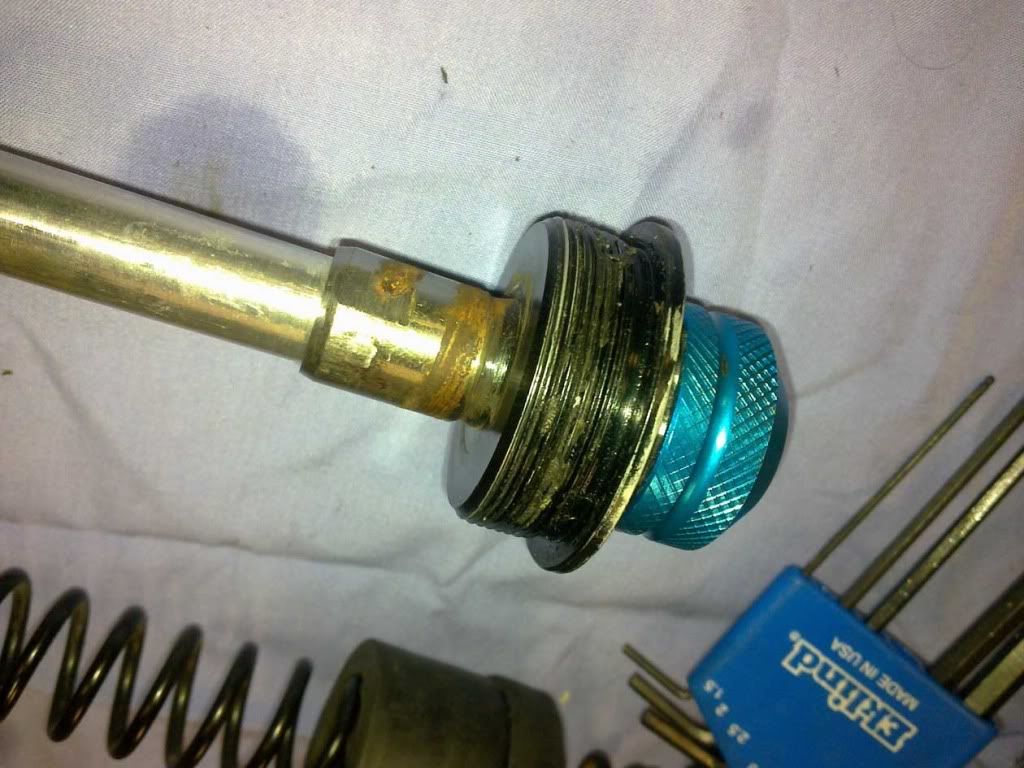
next clamp the upper section of the leg in the soft jaws again, remove the clicker by taking out the small screw in the centre, and undo the top cap with a large spanner or socket, MAKE SURE YOU USE THE CORRECT SIZE, mine are already chewed by the previous owner cos they do damage easily. AND FOR GODS SAKE DONT USE MULTI GRIPS!!!!!

undocap.jpg


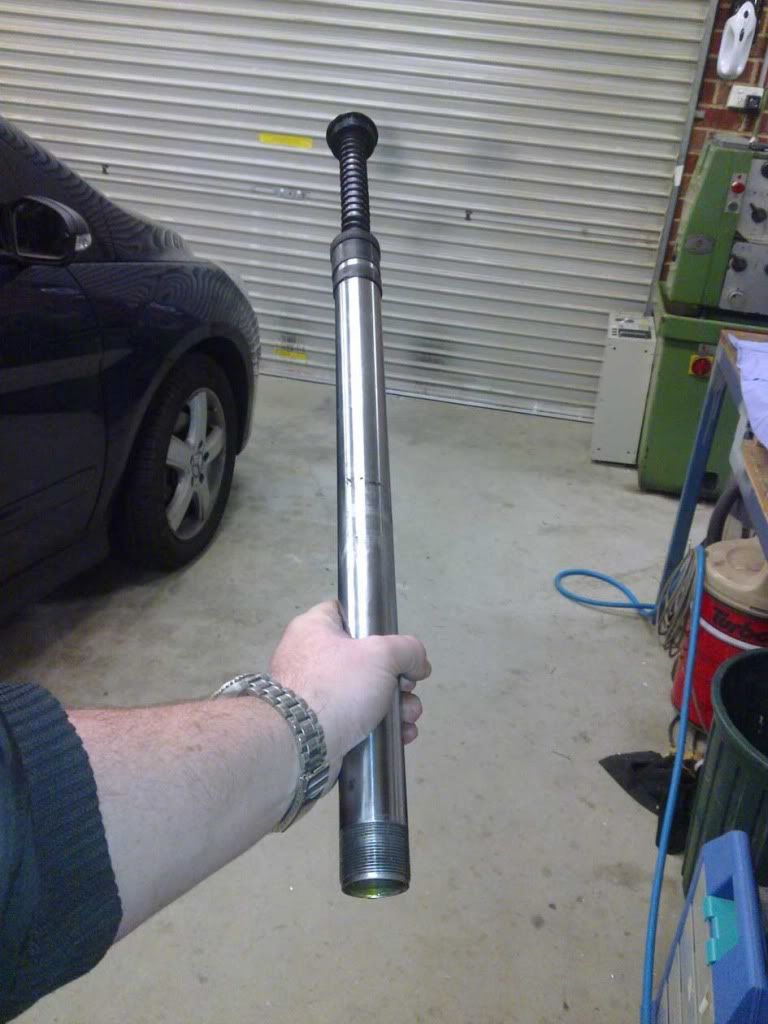
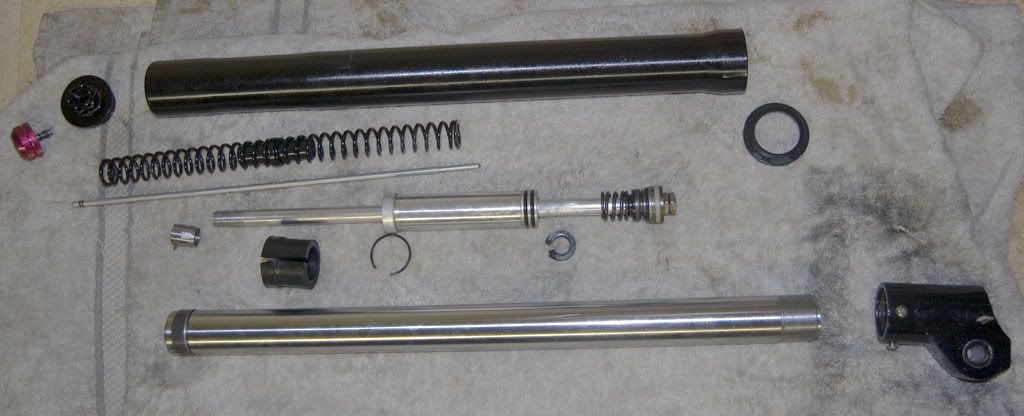
you can now slide the inner section free of the upper fork leg, the rubber bump stop is tight in the tube and may need some persuasion to get it out, sliding the lower leg up and down can usually get it free, you should have this.

remove1.jpg


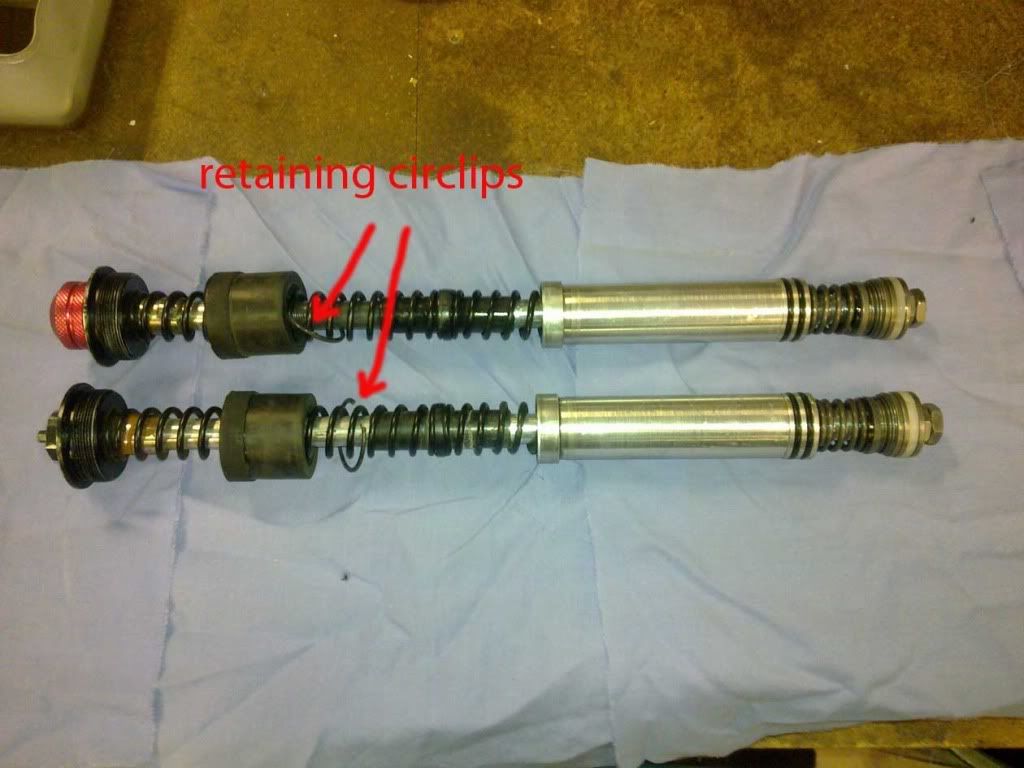
now the next bit is tricky, using small flat blade screw drivers you need to flick out the retaining circlip in the top of the lower leg as it does not have holes for circlip pliers, unfortunatly i didnt get a photo of me doing this, after trying to do this for 20 minutes, throw some tools, have a drink, maybe a smoke, and keep trying, once you get the first one the second will be easy.

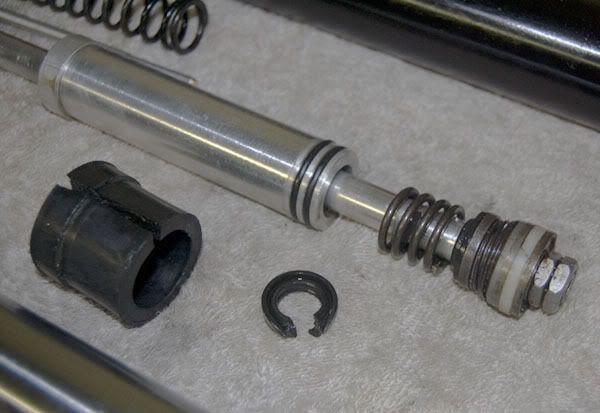
once you get those clips out you can slide the inner working free of the tube. You should now have this assembly.

remove3.jpg


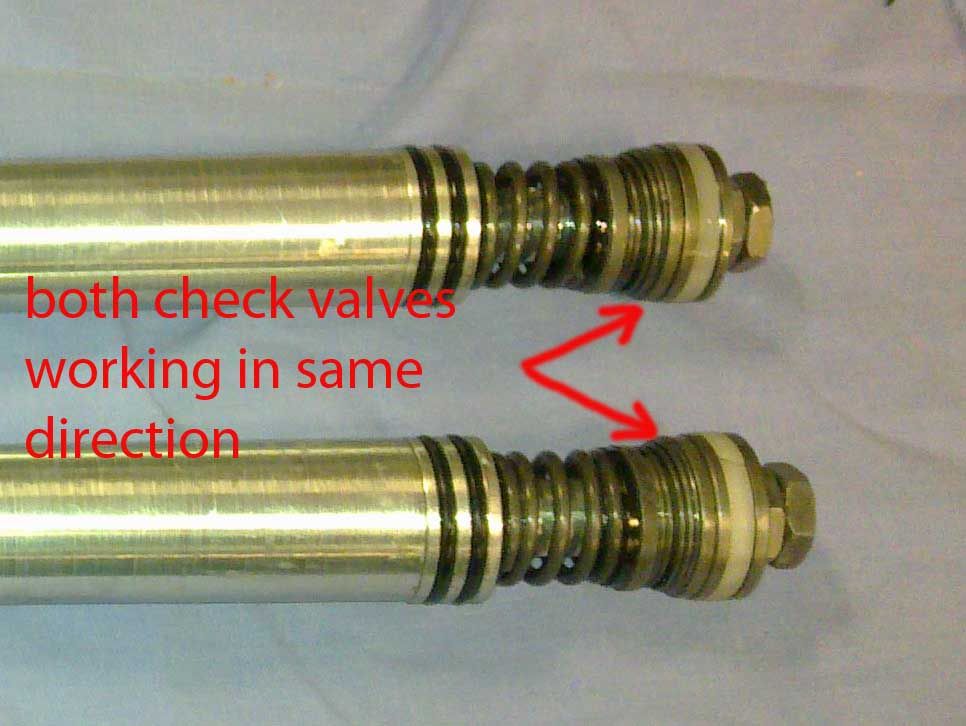
This is where i found my main problem, each fork leg has a check valve (one way valve)at the bottom that regulates the oil flow in one direction using the clickers, so in the rebound adjustment leg for example, the oil can flow fast up the leg when the valve opens during compression, but when the leg stretches out again the valve closes and forces the oil through the clicker adjustment (which is a needle and seat arrangement) which regulates the flowrate and therefore speed of return.

what i found was that both legs had the valves working in the same direction (rebound adjustment), so undid the 2 nuts at the bottom and removed the assembly.

checkvalves3.jpg
 
Last edited:
this image shows how the valve plates slides and is kept closed by the spring.

checkvalve2.jpg


this is a close up of the valve assembly on the rebound leg.

checkvalve1.jpg


now where was i.... with the nuts and valve assembly off you can remove the guide and springs, i didnt think my springs were stiff enough so i turned up some alluminium packers and added them at the top of the springs, 8mm in total. i didnt take a photo of them but this shows where they are under the fork cap.

springoff.jpg


at this stage it was midnight and i stopped taking photo's cos i wanted to get it finished and go to bed, but bear with me.

so with the springs packed, valves correctly fitted (one working each way) i set the adjustment ammount, at the bottom of the very inner tube. The clicker at the top is connected to a needle and the seat screws into the bottom of the pipe, looks like a grub screw with a tapered hole in it, i wound the clicker all the way till it touched the fork cap and then backed it off about 5 clicks, then screwed in the seat and used strong loctite to secure it in that position, this now gives me about 25 clicks adjustment compared to the 10 i had before, allowing the valve to open fully.

Now i fitted the inner legs back into the lower leg sections and cliped the circlips back in place, then slid that assembly back into the outer tubes and screwed the cap back into position, refitted the clicker caps and nearly done.

i wanted to check i had the correct ammount of oil so i screwed the foot back on the fork leg without any oil and compressed the leg, what i got was a smeer line 150mm from the fork seal / dust seal.
knowing this i then removed the foot, filled with about 180mls of 7.5wt fork oil, replaced the oil seal and foot and tried again, with a little trial and error (add and remove oil) i got the leg to stop compressing at 140mm when i put my weight on it, this tells me the oil shound be at the correct ammount for my weight.

Now.... when i fitted them back to the bike they are definatly better, however they still have about 30mm of static sag, and are still sluggish to move, what i am hoping someone can tell me is
A: do i need to pack the springs more, and how much is too much?
B: i have now noticed an air nozzle in the bottom of the foot under a rubber cap, i am guessing i need to pressurise the bottom of the fork leg, is this correct??
C: do i need to go back to 5wt oil, I am about 5'6 and weigh about 85kg, i only ride in the bush

hopefully this helps someone and you can help me too, i would like to get these forks working properly without spending hundreds on new forks.
 
Last edited:
I have a set of old set of Gpx forks that have that valve problem (clickers seem to do nothing). They are a different setup, they do not use any air but I have never pulled the foot off the fork tube. This sounds like what i need to do to get to the inner valve assembley, mine also makes a clunk sound on rebound. Are you able to get soft jaws that fit any vice?

As for your forks i'd pack them more unless you can find a stiffer spring that mite fit with or without modification. I have never had forks with air nossles,so i cannot comment on that.
 
yeah i am thinking i could pack them more but if i go too much the springs will bottom out before i hit the bump stops.

not shore on the soft jaws, you can just use a piece of aluminium angle but mine are a thicker set with a V in the middle for holding round stuff.

any of the super tech guys on here played with these things? advice would be great.
 
i can t really suggest anything other than try a bit of air in it as it may help the static sag.

packing the spring more will result in coil bind too early and more oil will only make it harder and more prone to blowing seals..

the correct way would be to buy stiffer springs or even new ones, but where from? who knows.. maybe take a spring to a moto suspension dude they may be able to match it up
 
great post

Hi, my son has the exact same forks and i am glad i came accross you post as it has answered a few questions i had but also leaves me witha few more unanswered.
I have pulled our forks apart and am confused about where the fork seal is. Is it at the bottom of the inner fork as you described after placing in a larger bolt to remove the seal ? or is it in the upper fork tube (black tube ) ? or does it only have the dust seal on here. Also do you pump air in the valve at the bottom of the fork to push that seal up into the bottom fork and would this help to reduce the spring sag.
Do these forks have a brand name.
i know i have sooooo many questions but i am at a loss as to where to go from here and i would appreciate any advice or help.
I have looked at you-tube and all the front fork oil changes or seals look different from these forks.
 
yeah i am thinking i could pack them more but if i go too much the springs will bottom out before i hit the bump stops.

not shore on the soft jaws, you can just use a piece of aluminium angle but mine are a thicker set with a V in the middle for holding round stuff.

any of the super tech guys on here played with these things? advice would be great.

ive had the same forks and all the same problems your suppose to put nitrogen in those bottom valves in fork boot.i put 100 psi in mine and there was a dramatic change.as for the clickers on top,one fork has only compression control and other fork rebound control.
 
You better get those forks done soon mate. Only 22 working days until the fest.:banana:
 
Those rubber boot things (in the circlips photo and also visible in the last photo) are they not supposed to come off until the top cap is unscrewed from the damper, or are they supposed to have a split in them??

I pulled my forks apart tonight to try and figure out why they don't work properly and it looks like someone has cut the rubber to remove it without removing the top cap. I let it be and put it back together with new oil and now it's running down the fork leg.
 
Pulled the fork apart again today and everything seems to be stuffed. Once I got the circlip out and completely disassembled the shock I found bits of broken plastic and also the rubber seal underneath the cartridge was blown out.

Anybody know of places on the Gold Coast/Brisbane who might have parts to repair this thing? Or does anybody have some cheap USD Forks they want to sell??? :frustrated::confused-smiley-013
 
Hi Mate,

Welcome to miniriders!

first off no the rubbers are not supposed to have cuts in them, these are a cartridge type fork so all the oil should be inside the cartridge, if its running down the leg then you have some issues.

after you screw the foot off the leg there should be a plastic plug that is sealed with an o ring around its guts, you can see me removing this in the 2nd pic, behind this is where all the oil should be.

also after doing this post i went even further with the forks,

in the bottom of the fork foot there was a rubber disc and under that was a valve, turnes out the rubber on mine was leaking so i replaced it with some 3-4mm insertion rubber sheet, just had to cut it to the right size, while i was at it i also replaced both valves and made sure they were sealing properly.

once everything was back togeather and sealed properly this time i used my compressor to blow about 100psi in through the valve into the bottom of the fork leg, you are supposed to use nitrogen but its not something i keep on the shelf. This made a huge difference to the forks, reduced the static sag and really got them working how they should.

hope that helps ya mate, i couldnt find anywhere when i was looking for parts for mine, thats why i had to make everything myself, hopefully you have more luck.

maybe post up some pics of yours and i'll try and point out whats wrong wih them.
 
Cheers mate.

The oil leaking out was most likely because at first I simply tried to fill the oil through the top (I'm used to the simplicity of conventional forks on my DRZ400) and it would have spilled out and over the shock cartridge.
The second time I pulled them apart.. the first thing I found was that there was actually some oil in the very bottom section of the shock (where the nitrogen goes). That section inside the shock had a bit of surface rust so I sanded it back with very fine sandpaper, and also replaced the two large O-rings on that plug and the small O-ring on the hex screw just to be safe (seems to seal well now).
Then when I removed the springs and tried filling the shock again I found that the catridge was not working like it should (there was no flow of oil or dampening effect) so I removed that circlip and pulled it all out and found the bits of broken plastic (which I believe was just parts of the smaller spring seat?) and the busted rubber seal. I don't think the plastic is a problem but the rubber seal is definitely a problem.. it looks like a tiny fork seal.
I'll try to get some pics up.
 
Here's the pics.

This is the whole assembly (the plug is still in the shock)
complete.jpg


And this is the problem. You can see there's a few things wrong. That big rubber piece has been cut. The plastic spring seat is broken (can see a bit of plastic still in the spring). The nylon thing is snapped (I think this might not be a big deal as it's only purpose seems to be to stop from scratching the inner tube). And of course that seal is busted. I'm thinking it won't even be worth replacing these parts when I could probably pick up another pair of forks for under $100.
closeup.jpg
 
Last edited:
Just updating this thread I managed to find a replacement cartridge seal from a bearing shop. In case it is of any help to anybody the size of the seal is 60IN-14x22 and the part number is 46040.
 
anybody got any other ideas on getting the bottom of the fork leg off? I have tried with the soft type jaws and the things just keep spinning (used wood, plastic and cork as clamping material...) I'm not to keen on using a standard vice as i'm sure I will crease the metal...
 
anybody got any other ideas on getting the bottom of the fork leg off? I have tried with the soft type jaws and the things just keep spinning (used wood, plastic and cork as clamping material...) I'm not to keen on using a standard vice as i'm sure I will crease the metal...

If you clamp close enough to the axle mount the fork doesn't move down that far so if you do scratch it, it wont hurt anything.

But.... clamp harder. Highly unlikely you will squash the leg. Use another metal, aluminium, lead, copper.
 
i used a set of alluminium soft jaws in my vise when i did this, did no damage at all to mine, but please be carefull...
 
Ahhhhhhhhhhh... So i purchased a nice big vice and cut up an old Tyre tube for "soft jaws" and proceeded to try again, Now i have finally managed to get the thing to spin more than 1/8 turn, however it now seems to spin (still with some tension) but it does not seem to be undoing at all (must of gone round 150 times...)? Has anybody else out there tried this on a standard set of nitrous forks? Am i missing a lock nut that i should of done first? There is an allen key bolt that i can get to through the bottom of the fork leg but it doesn't seem to want to come out. What am i missing :( P.S what way am i meant to be spinning it? I am hoping anti clockwise??
 

Latest posts

Back
Top