Mini Dirt Bikes & Pit Bikes Forum

Help Support Mini Dirt Bikes & Pit Bikes Forum:

This site may earn a commission from merchant affiliate links, including eBay, Amazon, and others.
here is the loom, and Regulator/Rectifier,
you will need to swap the new lighting copil in, then join the yellow and white wires to it.
the regulator needs the earth lead to go to the frame/mount for the reg/rect.
the fused red lead is the power lead for your wiring.

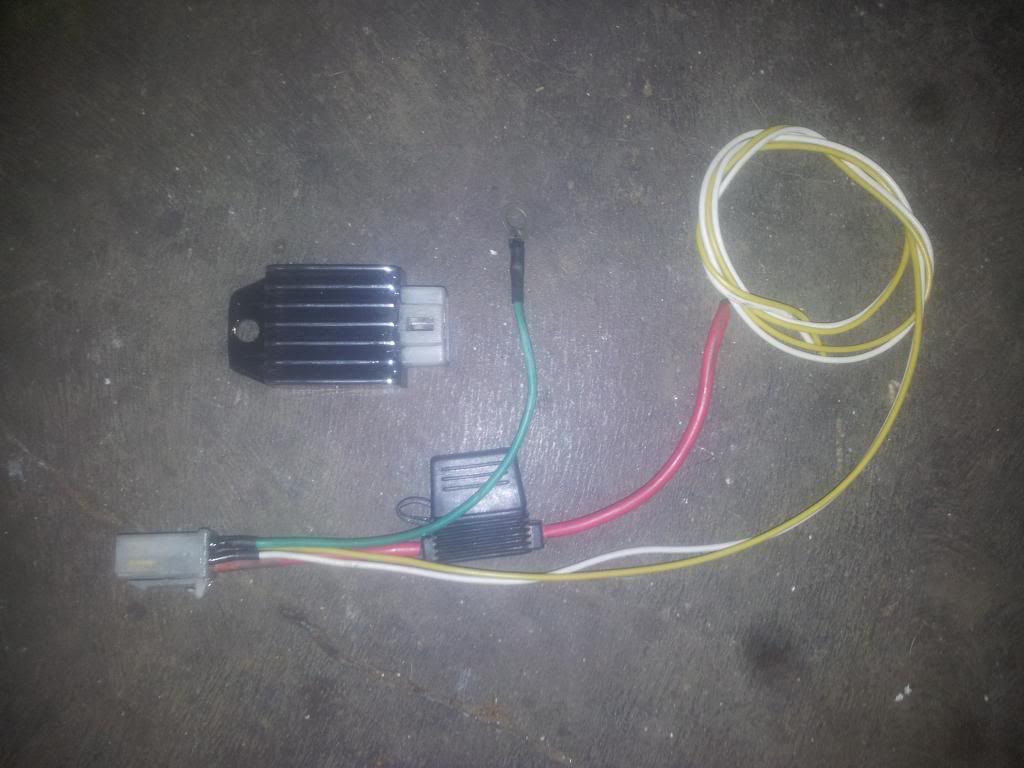
cheers mate it just turned up i'll have to hook her up soon and i'll let you know what im getting out of it
thanks again
 
hopefully we are onto a winner then!
this setup i sent, is the same setup i am running on the dune buggy.
at idle it put out just over 12 volts, but it charged the buggy's battery from about 1500 rpms and up, and had no trouble running just over 50 watts of lights too.
i was also running the same reg/rect on my Atomik Fuse for the lights, before i changed the stator over to the outer rotor, adjustable timing setup.

when you solder the yellow and white wires to the lighting coil, make sure you get a decent soldered joint.
the easiest way to tell if the joint is ok, is the solder will look flat/smooth and shiny, and completely coat all of the copper wires.
insulate the joint as best as you can, 2 or 3 layers of electrical tape,
when i use electrical insulation tape, at the end of the piece when it is wrapped around the wire,
i use the tip of the soldering iron to melt the end of the tape back to the layer below, it helps to stop it unwinding and coming off later.
and make sure the 2 lighting coil wires are run underneath the metal clamp on the stator plate, and that they run clear of any moving parts.

just make sure where you earth the regulator/rectifier to, is to a good/clean bare metal part on the frame, and earth out the green wire from the stator to the same point if you can.
adding a smear of grease to that bare metal will help stop corrosion too.
 
okaymadokee low beam is working :) wired up the tail light but theres a catch like always ..... (wiring talk:) so brown from the head light so thats the parking light so i ran a brown straight to the yellow.... i think.... maybe the red.... anyway the taillight is this right because i started it up nope nothin i dunno but im 3/4 of the way the which there so im getting there hahahhah meh..... wish me luck :)
 
tail light wiring-
yellow looks like tail light, red looks like stop light, black is earth for both stop/tail
 
yep earthed it so i may work that out during the week and hopefully ride the bloody thing lol 2 months??? lol
i find it heartbreaking that i haven't ridden for that long lol
jk :)


also my67xr, thanks heaps for all the help that you've given
 
also, try joining the tail light/parker (not the brake) to the wire powering the low beam (instead of the brown)
 
i'm pretty sure you only need the tail light to work when the headlight is on, eg with hi/low beams
i wouldn't worry about just a rear parker tbh
 
i will have to dig up my switch and check it out, how the light switch is wired.
does yours have a headlight off/on switch, as well as the high/low beam ?


worst case, if there isn't an extra wire for the tail light, then you could do it the way you have shown in your pic above if you modify the diagram a bit.

but you'll need to buy a couple of Diodes, 1N5404 3A 400V , they are .25c each from jaycar
solder one diode on the high beam output wire from the headlight switch to the tail light wire,
making sure the anode end of it connects to the wire from the switch, and the cathode end (striped end) is joined to the tail lights' postive wire
and then one from the low beam output wire, to the same tail light wire, diode to be soldered in, the same as above.
that way the power wont run back up to the other circuit, and turn both the high and low beams on at the same time
 
just looked at my switch, it only has off/on for the headlight, no low/high beam option.
you should have bought mine, much easier to wire up, lol.
 
lol na thanks man i had enough purchasing as i have new plastics and helmet ect from birthdays/and myself lol
but apperntly the old fella (grandfather) knows what to do so i'll just wire up the rear brake switch and the horn and let him finish it off lol
 
UPDATE!!!!! SHE IS DONE
so to wire it up (as in connect all the accessories to the power) i soldered all the positive together such as black/brake switch, red/fuse ,green/horn, grey/switch for headlight
then i will just tidy them up such as putting cable ties to the frame
A BIG THANKS To my67xr!!!
ill see how i go but i may chuck some pictures up tomorrow
 
well done, and took just under 4 months to sort out.
i hope your auto/bike electrician doesn't charge by the hour !!!
 
hurry up with the pictures too, school holidays is almost over.

and yeah,
i was joking about paying the auto elec,
if i charged by the hour, you'd need 3 jobs and a loan to pay me !

say each of your questions here took me 5 mins to read, work out and reply,
and that there were about 50 of my replys on this thread...
i have an hourly rate of $80, and a minimum charge of 1 hour.
well, i think i wont need to work for a few more months.......
 
school holidays ahaha im back at school already lucky SA
yer with school and no mode of transport makes it quite difficult to get around lol
and ive noticed that my headlight is not that bright but the rear brake and taillight are brilliant
so im thinking of replaceing the halogen soon with leds just the bulb as i like the plastic faring and what not it looks quite nice
i'll try and get some pics tomorrow night before the party im having lol
 
okay then the pics and also a couple of goodies from my birthday :)
DSC00694.JPG
a couple of the pushy and the modee \/
DSC00695.JPG
DSC00696.JPG
DSC00697.JPG
wiring and what not \/
DSC00698.JPG
DSC00700.JPG
DSC00699.JPG
brought her back from the farmlette today
 
Last edited:

Latest posts

Back
Top